How to Draw Shoulders
This is your unique chance to get unlimited personal tutoring at a tiny fraction of what it really costs.
Don't miss your once-in-a-lifetime opportunity
Enroll in the Life Drawing Academy now!
Shoulder Girdle Muscles
By Vladimir London
In the history of European fine arts, there are many of examples of artists who had limited understanding of human anatomy. This is especially apparent in medieval artworks of crucifixion. Even in later periods, when anatomy was no longer secret knowledge, some artists made junior mistakes, like in this artwork for example, where the chest muscle is overlapped by the coracobrachialis.
In this video, you will learn how to solve the challenge of depicting a shoulder girdle with the necessary knowledge of its anatomy.
In the Life Drawing Academy, you will see multiple video lessons where a model has raised arms. Drawing what you see seldom helps to draw a figure realistically. You have to know a human body's construction to depict it convincingly.
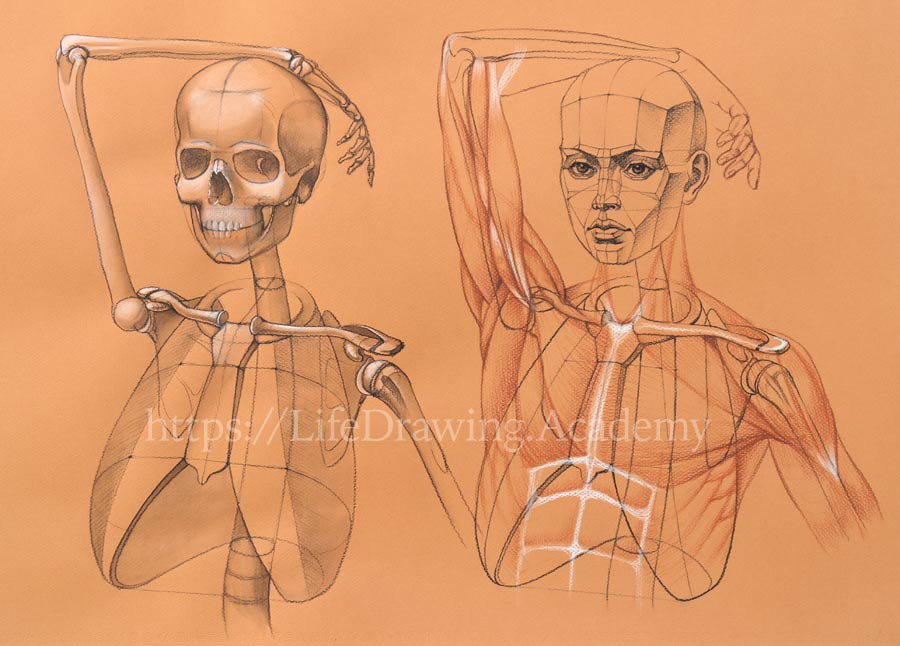
Here's the artwork we will build step by step in this lesson. Let's start with the skeletal structure of the upper torso. The first layer of ribs is simplified as an oval. The ribcage is the narrowest at this level and spans downward, becoming wider. The breastbone consists of two parts. It resembles a tie. There are three angles here.
I draw the ribcage as if it were one solid unit without separate ribs. Its overall volume is more important than the individual ribs for the purpose of this drawing. The front levels of the ribcage are seen in perspective and are parallel to each other. The spinal column has characteristic curves. The neck region of the spine is curved forward. The ribcage region is curved backward. And the waist region again curves forward.
From the top of the breastbone go the two collarbones. At the medial side, the collarbone has a round cross-section, and at the lateral side it becomes flatter. The pit of the neck is formed by the space between the collarbones. You may notice that the collarbone on the left is higher than on the right. This is because one arm is raised and the other is hanging down. Two first ribs connect to the breastbone right below the collarbones. This is the smallest pair of ribs; it defines the width of the neck. Below the collarbone, you can see the pear-shaped part of the shoulder blade. This is where the arm bone attaches at the shoulder joint. Next to it, there is a little-finger-like curved protrusion; it is called the coracoid process.
Above the shoulder joint, there is the acromion, which is the lateral part of the shoulder blade. It protects the shoulder joint from above. The head of the upper arm bone resembles a golf ball. Because it is round, the arm has great freedom of movement forward and backward, up and down, as well as some rotation. Next to the round head, there is a groove through which goes one portion of the biceps. We will draw muscles a bit later.
The other arm is raised. The upper arm bone measures approximately the distance from the pit of the neck to the bottom of the ribcage. It is also comparable to the width of the ribcage. The ribcage is not vertical but tilted backward. As demonstrated with this paper cylinder, we see its cross-section contours from below. That is why the ribs are curved upward. You may notice that while the shoulder blade on the right is in the vertical position, the shoulder blade on the left is rotated because the arm is raised.
We can use the distance from the pit of the neck to the end of the ribcage to measure the location of the top of the head from the pit of the neck. This level coincides with the end of the raised upper arm bone. The length of the collarbone approximates the height of the cranium. The same measurement is comparable to the height of the breastbone. It is also slightly bigger than the half of the upper arm bone. And it fits twice in the width of the ribcage. This measurement is the width of the head. It can be approximated as a sphere that encases the brain. The rotational axis at the base of the skull is parallel to the ribcage levels. This is the place where the spine connects to the skull at its base.
The distance from the base of the skull to the pit of the neck, divided in half, locates the chin. The chin's plane is parallel to the ribcage levels. The height of the face can be divided into three equal parts. One-third of the face is comparable to the distance from the chin to the pit of the neck. Thirds of the face define the levels of the eyebrows and the base of the nose. The line where the ear connects to the head is not vertical but slightly tilted. The top edge of the ear is at the eyebrow level. Its bottom edge is at the base of the nose level. Thus, an ear is approximately as high as a nose. The line of the eyes divides the head's height in half.
A central line of the face helps to draw it symmetrically. The height of the head is comparable to the length of the elbow bone. It is about four-fifths of the upper arm bone. These are the main proportions we need for this drawing.
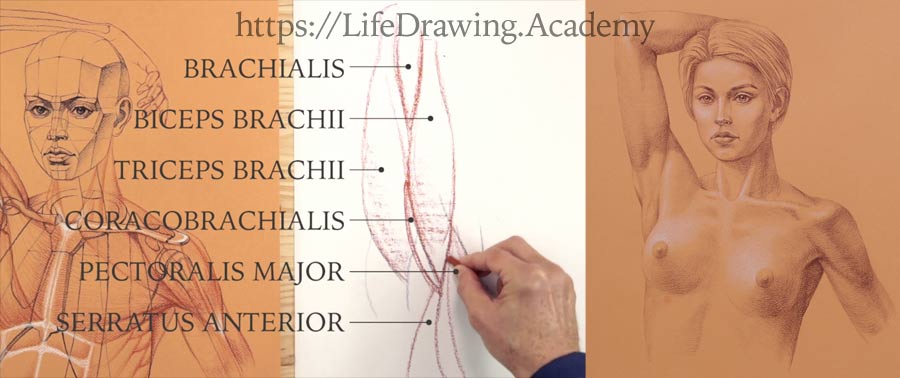
Let's fast-forward to the step where I can explain the anatomy of the shoulder girdle's muscles, as this is the main objective of this lesson. The biceps originate from the shoulder blade and insert into the radius bone. The triceps go from the shoulder blade and the upper arm bone to the elbow. Between these two muscles, there is a shoulder muscle. It originates from the upper arm bone and inserts into the elbow bone.
Next to it, there is a muscle that connects the coracoid process with the upper arm bone. The widest muscle of the back originates from the spine, ribs, and sacrum and inserts into the upper arm bone. In this drawing, we see it in front of the triceps. The chest muscle has three portions, which start from the collarbone, breastbone, and ribs and insert into the upper arm bone. In a raised arm, this muscle twists around the biceps, which push it backward. The area of insertion of the chest muscle can be divided into three points. The collarbone portion of the muscle inserts in the lower point, the breastbone portion into the middle point, and the lower portion in the upper point.
The big round muscle of the shoulder blade goes next to the widest muscle of the back. The small round muscle of the shoulder blade is difficult to spot in this view, but I will place it anyway next to the previous muscle.
The deltoid originates from the spine of the shoulder blade, acromion, and lateral half of the collarbone and inserts to the middle of the upper arm bone. In this view, we see both back and front portions of this muscle. The front portion of the deltoid is pushed up by the raised chest muscle.
Let's come back to the biceps of the other arm. One portion originates from the coracoid process and the other from the shoulder blade and goes though the groove next to the head of the upper arm bone. The triceps take part in defining the outlines of the upper arm.
In this view, we see all three portions of the deltoid—back, side and front portions. The trapezius plays its role in the neck and shoulders outlines. The neck muscle inserts right behind the ear. These two muscles form the characteristic "V" shape that points to the pit of the neck. The shoulder blade has no firm connection with the ribcage. It is attached to the ribs via muscles. As its name indicates, the external oblique muscle has fibers that go diagonally at the torso's side.
The knowledge of origins and insertions of every muscle that influences body appearance should not be underestimated in life drawing. Without it, you will be drawing what you see, and the challenge is that you cannot see what you do not know.
If you did not memorize the intertwining of shoulder-girdle muscles, here's a tip. Just make seven zig-zag lines. These lines can serve as guides for the muscles' overlap. I will use red chalk to quickly mark the major muscles. Here's the muscle that the artist placed incorrectly in the artwork you saw previously.
You would agree that it is very challenging for an artist to depict all those muscles from life realistically without proper knowledge.
Here's a drawing of a model with a raised arm that is done with the necessary anatomy in place.
The next time you draw similar poses from life, remember the shoulder girdle muscles interlocking.
For students like you, we created the Life Drawing Academy. So, you could learn, without leaving your home, from talented artists and art teachers who went through Russian art education system themselves and teach art in the best art academies of the World.
There are two options available for you:
- You can take the self-education Life Drawing Academy Online Course
- Or, for one-to-one teaching, you can apply for the Life Drawing Academy Correspondence course
Here's what you will get in the Life Drawing Academy Online Course:
- For a one-time payment, you will get a lifetime access to the online course.
- In this course, you will get 52 life drawing video lessons, which include more than 70 video-parts and have total playback time of more than 20 hours. You can watch those videos as many times as you want. They are available online 24/7; and you can watch lessons on any internet connected device.
- You will get detailed tutorials on proportions and construction of a human head and body.
- You will discover various classical canons of proportions and detailed instructions on how to use them in drawing.
- You will learn how to draw realistic portraits and figures step-by-step with the necessary knowledge of anatomy.
- Also, you can rely on personal support from the Academy tutors, who will provide constructive critique on your artworks, answer your art-related questions and advise on how to improve your drawing skills. This personal support is unlimited and comes at no extra charge. You won't get the same deal anywhere else.
- Upon completing the course, you will get the Life Drawing Academy Diploma in your name.
Here's how Life Drawing Academy Course compares to top-50 contemporary art colleges in the West:
- Every video lesson of the Life Drawing Academy self-education Course gives more information about classical figurative drawing than students get during 4 years at a contemporary art college. After watching 52 lessons, you will know at least 52 times more about life drawing than an average art college graduate.
- The Life Drawing Academy course comes with a lifetime membership. Just name any contemporary art college where you can study for as long as you want for a one-time low fee.
- A contemporary art college would take 4 years of your time and requires relocation. In the Life Drawing Academy, you can study in the comfort of your own home. There are no deadlines here; you can study at your own pace.
- In the Life Drawing Academy, you will have an unlimited personal support from the Academy tutors. Such support comes at no extra charge and is provided for a lifetime. Can you name any art college where you would get the same support?
- When it comes to the price, a contemporary art college would cost you anything up to $100,000, including tuitions, relocation, and accommodation expenses.
The real value of the Life Drawing Academy Online Course is $99 per every video lesson, which is $5,148 for 52 lessons; plus, personal support, which is priceless.
However, you can enroll today at a heavily discounted price of only $297 US dollars!
In each video lesson of this course, you will discover more about figurative drawing than any contemporary art college or university would teach you in four years.
If you want to receive personal tutoring from the Academy teachers, you can apply for the Life Drawing Academy Correspondence course. This is a great value "optional extra".
Life Drawing Academy is your unique chance to learn from accomplished fine artists and art teachers — Alexander Ryzhkin, Vladimir London, and Natalie Richy — who can personally teach you strong drawing skills step by step. All three teachers have exceptional art education and spent many years practicing and teaching art. The drawing techniques and methods we teach are the same as students learn in the best art academies in Moscow and Saint Petersburg.
Here's what you will get - In addition to all the benefits of the Life Drawing Academy Online Course, you will also receive personal tutoring that is custom tailored to your current level of drawing skills.
In this course, you will receive one-on-one personal guidance from academy tutors, who will teach you traditional drawing skills in 100 drawing tasks. Every task will have in-depth instructions, including several discussions, critiques and pieces of advice on improvement. The value of such tasks is $99 each, which is $9,900 in total.
However, for a limited number of students, we offer this course for only $997. When the places are filled, we will suspend enrollment or put the price to its real value.
This is your unique chance to get unlimited personal tutoring at a tiny fraction of what it really costs
Don't miss your once-in-a-lifetime opportunity
Enroll now!


