How to Draw a Person
This is your unique chance to get unlimited personal tutoring at a tiny fraction of what it really costs.
Don't miss your once-in-a-lifetime opportunity
Enroll in the Life Drawing Academy now!
How to Draw a Person
By Alexander Ryzhkin
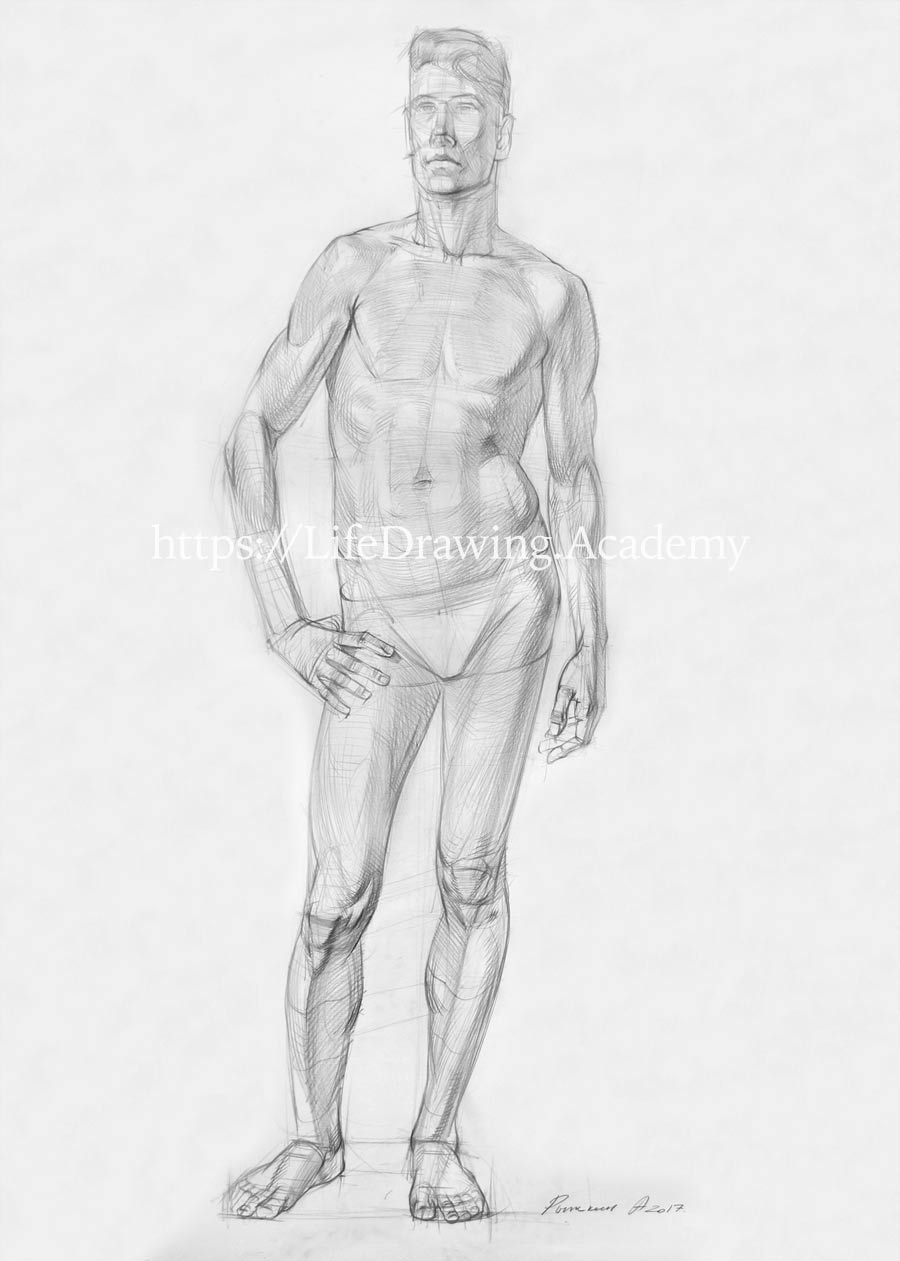
In this video lesson, you will discover How to Draw a Person. We will draw a standing figure with its weight shifted to one leg, using constructive drawing principles and the knowledge of a human figure proportions to make this figure well-proportioned. Here's the result that we will achieve at the end of this lesson.
Let's begin. What do we need to know and remember when we're drawing a male figure? There is a system of fast drawing when gesture sketching helps to portray the pose of a model. And there is the system of long drawing a constructive study of a figure. It is more correct to start with a gesture sketch to capture a dynamic sign of a figure. This dynamic gesture drawing can be done as a separate preparatory sketch. For example, we can use a corner of the big format paper to draft a model's pose. Here, we will schematically mark diagonals of the legs, the tilt of the pelvis, and the curvature of the ribcage. This, together with the position of the head, gives us a flowing line of the figure that bends from one side to another. If, for some reason this dynamically flowing line were to disappear from our main drawing, we can always refer to this sketch to remind us the first impression of the model's pose. So, it is very important to keep this gesture sketch in mind and see that every line of the figure has its tilt and direction. It is especially helpful for beginners to make such quick gesture sketches.
We begin the main drawing with the top and bottom points of the figure. Here's the top point. And here is the bottom one. Then, we imagine a virtual vertical line that runs from the top to bottom between these points. This vertical axis should be very light, not to interfere with the future drawing. This helping line is required only for measuring proportions. If we take the figure from the top to bottom and divide it exactly in half, the middle of the figure would coincide with the pubic bone or the axis of the hip joints.
The hip-joint level is always easy to spot when a model stands in contrapposto because it is the point where the line of the leg changes its direction to the line of the torso. If the model stayed straight, the second hip-joint would be on the same level as the first one. In our case, because the figure is in contrapposto, the pelvis is tilted, and this tilt will be depicted in our drawing. To measure this first proportion in drawing we can use a paper stripe. First, we mark the middle of the figure, judging its position by eye, and then this dimension can be checked using a paper band. Don't be afraid to make some misjudgments—you can always double-check measurements.
After marking the exact center of the figure, we need to find the dimension of the head, because the size of the head will be a measuring unit to evaluate many other proportions of the figure. The classical canon of proportions tells us that the head fits into the body exactly eight times. However, when a figure stands in contrapposto, its height is slightly lower. This happens because the pelvis is tilted and the spine is curved. Therefore, the head will fit not eight, but about seven and a half times into the figure's height. This is not always the case in real life, and you need to measure this proportion on a model. To find this dimension, we divide the upper half of the body in half. This gives one-quarter of the figure. And the top quarter we divide in half once again. This is the one-eighth of the total height. We add a little bit of space right below of the top division, and mark this dimension as the size of the head, which fits approximately seven and a half times into the body. This is a very convenient way of finding the head's size, because it saves us the trouble of measuring that seven and a half proportion.
The lower half of the body we also divide in half. The easiest way is to fold a piece of paper in half and mark the one-quarter mark. Why is this one-quarter mark important for us? Because it coincides with the top edge of the tibia, the main bone of the lower leg, which is the same place where the bottom edge of the kneecap is. So, by marking this point, the middle of the figure, and the size of the head, we have several main proportions that will help us to build the rest of the body. These points are set in stone, and we will try to keep them unchanged.
The next step is finding the distance from the chin to the pit of the neck. Why the pit of the neck is so important in drawing? Because from this point we will measure the dimensions of the torso. Other important points are the pubic bone and the kneecap, which help to keep the lower part of the body in proportion.
If we divide the height of the face into three equal parts, we will get three equal distances—from the chin to the base of the nose, from the nose to the eyebrows, and from the eyebrows to the hair-line. One-third of the face is very similar to the distance from the pit of the neck to the chin. These distances are very close, providing that the model does not turn the head up or down, but looks straight. These proportions work in a normal head position. Taking one third of the face, we plot this distance down from the chin and mark the pit of the neck.
The next step is to measure the tilt of the shoulders. To do so, we can use a pencil. First, we measure the angle on the model, then, moving the pencil toward drawing, we mark the tilt. All lines we do at this step are very light, almost invisible. You can use very light pencil pressure to avoid bold lines. This way, we can easily erase any mistakes if needed. Another important line is the tilt of the pelvis. It is tilted in the opposite direction to shoulders.
What is contrapposto? When a model stands with the weight supported by one straight leg and another leg is bent at the knee, and the pelvis takes a position when its one side is lower than another. To counter-balance such a tilt of the pelvis, the spine bends, and the ribcage assumes a counter-posing position. That is why the pelvis and shoulders are inclined in different directions. To make sure that a figure in contrapposto keeps its balance and doesn't visually fall to one side, you need to ensure that the pit of the neck projects to the ground where the footprint of the supporting leg is. In other words, you need to make sure that the neck is located exactly on the same vertical line as the foot of supporting leg. Slight movements to the left or right side are possible, but in general, this is the good way to make a figure visually balanced.
In contrapposto, a neck will always be above the supporting leg. That's what we do in our drawing–we locate the pit of the neck on the same vertical line where the supporting leg's foot is. Here's where the foot is—right below the neck. Now we can connect the hip-joint of the supporting leg with its foot. The supporting leg will never be vertical. There's always a diagonal angle. The edges of each shoulder are located on the same vertical lines as the edges of the pelvis. Here are widths of the shoulders and the pelvis. The spinal column is curved to one side. We are still drawing with almost invisible lines. In contrapposto, the whole torso is curved along the spinal column. At this step, we have enough vertical proportions and can continue with the proportions of width.
It's time to check the width-to-height ratio. To do so, we will check how the width of the shoulders measures to the height of the torso. On the model, you can see that the width of the shoulders is very close to the distance from the pit of the neck to the navel. You don't have to measure directly on the model as I did for demonstration purposes. Instead, you can stand back and measure this proportion using a pencil, aligning it to the shoulder line and then to the vertical line of the torso. To find out the location of the navel, you need to remember that the torso has three almost equal dimensions—the distance from the pit of the neck to the solar plexus (or the pit of the stomach), from the pit of the stomach to the navel and from the navel to the pubic bone. That is why we can take the distance from the middle of the figure or pubic bone to the pit of the neck and divide it in three equal parts. One, two, three. And we get the point of the navel, the point of the end of the breastbone or pit of the stomach.
Now, we can measure two-thirds of that distance or the distance from the pit of the neck to the navel and use this measurement to mark the width of shoulders. Every model is different, and exact dimensions might vary. We do the same with the width of the pelvis. We can measure it on the model. In our case, this width is very close to the width of the shoulders. As previously, we can use a pencil to check this proportion. First, we measure the width of the pelvis and then compare it to the shoulders. Our male model has shoulders slightly wider that the pelvis. In female models, this dimension can be the same. We mark this proportion in the drawing. With time and practice, you will feel these proportions without thorough measurements. But in the beginning, you may want to work on precision.
The sequence of steps you see in this video lesson is an explanation of what is happening in a professional artist's head. It doesn't mean that every life drawing has to follow this sequence of preparatory measurements. A professional artist automatically feels these proportions without measuring them on a model. With the main proportions in place, we can come back to the 'sign' of the figure, which is already taking place in our drawing. We also need to check alignments. For example, how much is the model's right shoulder protruding beyond the pelvis's edge? We must also check the alignment of the model's left shoulder with the edge of the pelvis.
Now, we can mark the neck in the middle of shoulders. I'm still using a very light pressure on pencil, keeping lines very faint. If you don't see much in this drawing, do not worry, it's because all lines are almost invisible so far. Just follow my explanation to memorize the sequence of steps. And we place the oval of the head above the neck. It's time to determine the location of the elbow and the foot of the other leg. It is very helpful to draw two vertical lines from each shoulder downwards. We can also measure the distance between two elbows and compare it to the height of the torso. In our case, the width between elbows is equal to the distance from the pit of the neck to the pubic bone. This is just a coincidence, not the rule.
In a big-scale drawing, I can use my arm to do some measurements. I can also see that the vertical line from the model's right elbow projects to the edge of his right foot. This is also a coincidence. We draw the width between elbows and now can check the width between feet. A model feels comfortable in contrapposto, when the distance from the edge to edge of each foot is similar to the width of shoulders. This happens almost every time. To demonstrate it, I can measure this distance and compare it to the shoulders' width. We can apply this proportion in drawing.
By now, we have all key points of the figure to continue drawing. Another proportion you need to keep in mind is that when an arm is hanging down, the middle finger almost always reaches the middle of the upper leg. We can check this proportion on the model. With this knowledge, we can divide the distance from the knee-joint to the hip-joint in half and this point will be the end of the model's right hand. When an arm is hanging down, the wrist is located on the same level as the hip-joint. Which means that the length of the upper leg is equal to two hands from the wrist to the tip of the middle finger.
In contrapposto, the alignment of the wrist and the hip-joint can be slightly different because the spinal column is bent. In our case, the hip-joint is slightly higher than the wrist.
Here's another important proportion. The distance from the pit of the neck to the middle of the figure is equal to the distance from the ground to the top of the kneecap of the supporting leg. It is the same distance as from the top of the kneecap to the top of the pelvis. These three dimensions should always be equal to each other. I can demonstrate it on the model. Here's the distance from the pit of the neck to the middle of the figure. This is the same distance from toes to the top of the kneecap. And this is exactly the same dimension from the top of the kneecap to the top of the pelvis. These dimensions can vary. For example, some people might have shorter legs, and therefore a torso would be proportionately longer. And tall people might have longer legs in proportion to the torso. You need to see the differences in every particular case. With this knowledge in mind, we can check these proportions in our drawing. This is also a good way to check where the top of the pelvis is. Usually, the distance from the hip-joint to the top of the pelvis is equal to the half the height of the head, or the distance from the chin to eyes.
In male figures, we can see that a virtual line from the shoulder to the navel goes though the nipple. Two shoulders and the navel form a triangle. This virtual triangle is a helpful aid in drawing. You can compare two triangles – one on the model and another in your drawing to each other to check if alignment, angles and proportions of the top part of the torso are correct. You can also notice that the distances from the edge of the shoulder to the armpit and from the armpit to the bottom edge of the chest are equal. This proportion helps us to mark three dots on each side of the torso—the edge of the shoulder, the armpit and the edge of the chest.
Now we can divide the shoulder width into four equal parts. The dot in a middle between the shoulder edge and the pit of the neck projects downward directly to the nipple. So, here's another figure—a square or almost square rectangle aligned between the collar bones and the line between nipples. If we connect two corners on each side of this square with the armpits, we would receive an irregular symmetrical hexagon. This can be used to check the symmetry of the chest...
[ The full lesson is avaibale to Life Drawing Academy members ]
This is your unique chance to get a lifetime academy membership and a dedicated team of art teachers.
Such unlimited personal tutoring is not available anywhere else.
Enroll in the Life Drawing Academy now!


