How to Draw Male Body
This is your unique chance to get unlimited personal tutoring at a tiny fraction of what it really costs.
Don't miss your once-in-a-lifetime opportunity
Enroll in the Life Drawing Academy now!
How to Draw Male Body
By Alexander Ryzhkin
In this video lesson, you will discover How to Draw Male Body.
When a beginner starts to draw life figures, he or she might not know the proportions of a human body or maybe forgets to use them, especially during short poses. This results in mistakes. A proficient fine artist doesn't necessarily start with drawing ratios and helping lines but keeps them in mind and applies correct proportions automatically.
What we did in part one of this video lesson is very helpful to know, yet drawing might begin differently—instead of plotting and measuring, we can start with a gesture drawing, intuitively capturing correct proportions and then, if in doubt, double-checking all dimensions and ratios in question using rules of human body proportions, checking them on a model, and making sure that the drawing is correct. There is the so-called "systematic error" an artist might have. One person will always tend to draw a bigger torso. Another will draw longer legs or wider shoulders, and so on. So, double-checking proportions is necessary to ensure good results in life drawing.
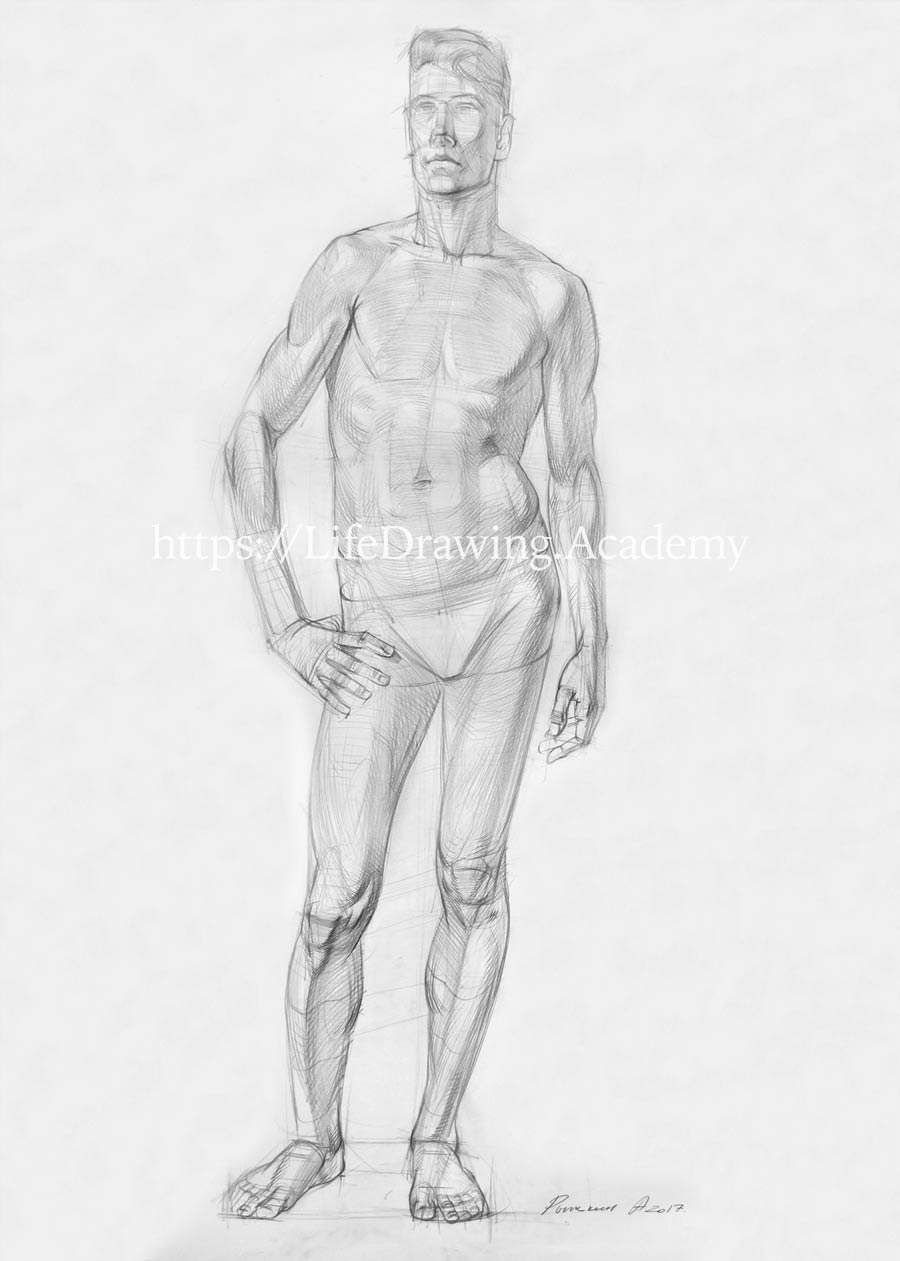
In this video session, we will continue talking about the proportions of a human figure. We can compare the distance from the edge of the shoulder to the pit of the neck to the distance between nipples. In most cases, in a male figure, these dimensions will be equal. I can demonstrate these proportions on the model. The distance between nipples is very close the distance from the pit of the neck to the shoulder's edge. In addition, we can compare the distance from the nipple to the pit of the neck, which is also very close to the distance between nipples in a male figure. This distance is also very close to the length of the hand from the wrist to the tip of the middle finger. A hand is the measuring unit for such distances as from the shoulder's edge to nipple, from the nipple to the pit of the neck, and the distance between nipples. The length of the hand is also equal to the height of the face. That is why we apply these proportions in drawing with confidence. We can measure the chest and the face also compare them to other dimensions, for example to the pelvis height.
If we connect shoulders, nipples and the pit of the neck, we will get the equal-sided letter "W." The front lines of the deltoid muscles go from the middle of the collarbones to the middle of the upper arm bone. Their ends can be visually connected by a curved line that coincides with the bottom edge of the chest muscles. You need to recognize the edge of the deltoid muscle to mark its location with precision in drawing. We draw them in a pair to ensure symmetry.
The widest part of the ribcage is in the region of the eighth rib. Here is where it's located on the model. Below these points, the ribcage gets narrower; above these points the ribcage points to the neck. We mark the widest part of the ribcage in the drawing and add in pairs two lines to the waist and two lines towards the neck. You need to avoid the error of being confused by the widest muscle of the back, which goes towards the shoulders, visually making the ribcage wider at the top. The widest muscle of the back points to the dot located in the middle of the deltoid muscle. So, do not confuse the edge of the widest muscle of the back with the edge of the ribcage. The ribcage leads to the base of the neck.
Here are the lines of the ribcage. The widest muscle of the back is located beyond the armpit and the biceps of the arm. The outlines of the torso in the waist region are following the angle of the spinal column. You can see that the angle of the ribcage is opposite to the angle of the waist. You need to avoid a junior mistake, which is misplacing the outlines of the waist. You can check its angle with a pencil on a model. In a female model, the pelvis is a bit wider, and these outlines might look slightly different.
It is good to double-check that the tilt of the lower edge of the chest muscles is the same as the tilt of the collar bones. And this tilt goes in a different direction to the tilt of the pelvis. The line of the waist, however, is almost horizontal. Depending on a model, this line can go through the navel or a bit higher, but in any case, it will be horizontal. You can notice that the lines of the chest, waist, and pelvis are diverging towards some point far beyond the drawing area. Do not confuse this with perspective. This is just the angle of lines when a figure stands in contrapposto.
The pelvis a rigid structure. It tilts as one solid unit. At the front of the pelvis, you can see a semi-circular shape that goes from the top of the pelvis to the pubic bone. This shape is similar in size to the arc of the ribcage. That is why you can imagine a virtual oval that lies below the breastbone and above the pubic bone. Depending on the model, the arch of the ribcage can be circular or triangular. Athletic models have more rounded arches. This shape is influenced by the volume of muscles. The outer outline of the upper leg points towards the knee. This diagonal direction is repeated by the line of the tailor's muscle, or the sartorius muscle. Between these two lines we have a mass of the leg that is positioned diagonally. The volume of the upper part of the supporting leg shall be equal to the volume of the other leg. That is why the line between the two knees will be tilted at the same angle as the tilt of the pelvis.
It is important to notice that the cylindrical shape of the model's right upper leg is pointing towards the viewer, while its lower part points away from the viewer. This spatial position is indicated by ovals of cylinders of the upper and lower leg. When a model stands straight, the elbow is located on the same level as the lower edge of the ribcage. The lower edge of the ribcage is where the waist is. You can see that on the left the elbow coincides with this level, but on the right it is a bit lower because the model stands in contrapposto. This depends on the tilt of the torso. That is why the tilt of the shoulders is equal to the tilt of the line between the elbows. Keeping this alignment in mind, we can mark the locations of the two elbows in drawing. We need to make sure that both upper arms have the same length. Also, remember that the distance from the armpit to the elbow is very similar to the length of the hand. This is the same distance as from the nipple to the pit of the neck, or from the shoulder's edge to pit of the neck. It is also equal to the height of the face.
After drawing the upper arm, a beginner would continue to the lower arm. However, if the hand is placed on the hip, it is better to draw the hand first. We mark the size of the hand and its volume and only after that, we connect the volume of the lower arm to the hand. Drawing in this order helps to avoid any possible misplacement of the hand on the hip. The width of the hand near the first phalanges is equal to the distance from the chin to the wings of the nose. Spread-apart fingers can be compared in size to half of the face or half of the distance from the navel to the pubic bone. Such proportions will help to avoid the beginners' mistake of drawing the hands too small. The inside outline of the upper leg is dictated by the group of muscles that bring the legs together. At the point where the tailor's muscle touches this outline, the outline changes its direction and follows the quadriceps muscles. The inside outline of the upper leg should not look as straight as the outer outline. This line has an angle, which is formed by two different volumes of big muscles.
Now, it's time to draw another hand. I can see that the finger of the model's right hand points to the left hand. We can mark this virtual line of constructive drawing. At the same time, we can draw outlines of the model's underwear. I won't spend much time on this topic. When a model is partly dressed, you still need to understand the anatomy of a human figure and apply proportions and shapes to avoid constructive mistakes.
Coming back to the hand, we need to make sure that the wrists are proportionate to each other. The angle of view on the two wrists is different, and therefore one wrist will be a bit wider than other. Now, let's continue with the supporting leg. From the hip-joint to the medial ankle is a straight line. As a figurative artist, you always have to see this virtual diagonal line. However, in the middle, this diagonal is interrupted by the angle of the knee, which goes in a different direction, pointing outward, not inward. And thereafter, the lateral outline of the shin points toward the big toe. The contour of the shin looks curved. On the medial side, we see the calf muscle that compensates for the lateral curvature of the shin. However, this calf muscle would never protrude far beyond a virtual line between the knee and the medial ankle. You also need to remember that the lateral ankle is always lower than the medial ankle. As soon as we mark the ankle, we need to check its dimension. The width of the ankle is slightly smaller than the distance from the shoulder's edge to the middle of the collar bone, or from the nipple to the breastbone.
Now we can check the width of the calf muscle, the knee, and the foot. Let's check these dimensions on the model. You can see that the width of the calf muscle is equal to the width of the foot and also equal to the width of the knee. The same dimension is very close to the width of the neck. Which is also equal to the distance from the nipple to the breastbone. Of course, these dimensions will not be precise. Nevertheless, you can use them to have some checkpoints to measure. Check the width of the neck, the knee, the calf muscle, and the width of the foot. We can do the same for the other leg. All these sizes will work for the model's right knee. We see the knees at different angles—one is positioned frontally and the other in three-quarters, and the width of the knees might look different to you. They are actually the same in width. The same goes for the calf muscle because the leg has an almost circular cross-section at this level. And, coming down to the foot of this leg, we need to ensure that it has the same width as the other foot. Of course, this foot is seen in perspective and some adjustment might be required to take foreshortening into account. We also need to mark the width of the head, which can be compared to the distance between the nipples. In a male figure, usually the total width of the head does not surpass the distance between nipples. As you remember, this dimension is close to the length of the hand.
n female models, you can use a hand or the height of the face as a measuring unit. The width of the head can be measured on the model from a distance using a pencil. Take into account ears and hairstyle, which will influence the head's width. We also need to check the distance from shoulders to ears. It is important to mention that the outline of the trapezius muscle, should you extend that line farther, points very close to the chin. And the distance from the point where the line of the trapezius intersects with the neck to the ear is the same as the distance from the pit of the neck to the chin. I will demonstrate this proportion on the model. You can see that these two distances are equal. Another helpful line is the oval of the neck. We also mark the line from the bottom of the ear to the base of the nose.
In contrapposto, one outline of the neck will be a bit longer than the other because of the shoulders' tilt. The seventh vertebra of the neck is located at the cross-point of the trapezius outlines. Keep in mind that the line of the neck always runs down to the collarbone. It doesn't stop at the trapezius. Do not draw this line sliding into the shoulders. The neck goes downward to its base, indicated by the oval...
[ The full lesson is avaibale to Life Drawing Academy members ]
This is your unique chance to get a lifetime academy membership and a dedicated team of art teachers.
Such unlimited personal tutoring is not available anywhere else.
Enroll in the Life Drawing Academy now!


