How to Draw a Man
This is your unique chance to get unlimited personal tutoring at a tiny fraction of what it really costs.
Don't miss your once-in-a-lifetime opportunity
Enroll in the Life Drawing Academy now!
How to Draw a Man
By Alexander Ryzhkin
In this video lesson, you will discover How to Draw a Man. In the two previous video sessions, we established the proportions of the model. It is time now to depict the body's forms, part by part. Let's begin fine-tuning the figure's outlines and contours.
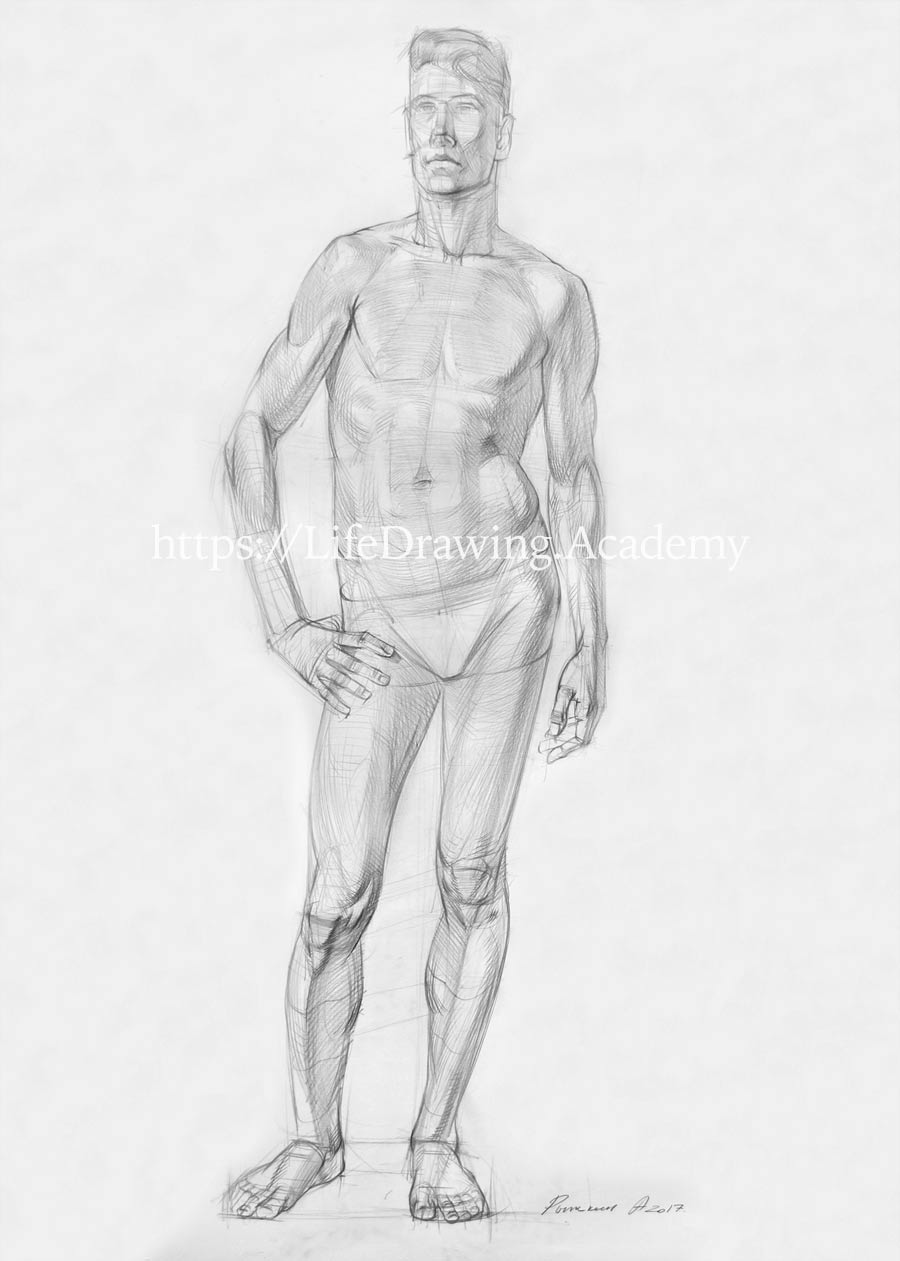
The line of the trapezius muscle merges with the end of the collarbone. The collarbone starts from the pit of the neck, curving along the base of the neck and then changing its direction in the middle. It connects to the acromion. This is the place where the collarbone ends. The same happens with the other collarbone. It starts from the top and the middle of the breastbone, and it bends toward the shoulder's edge. At the top, the outline of the trapezius muscle points to the end of the collarbone, where one portion of this muscle actually connects to this bone. At the end of the collarbone, there is an acromion, from which the side portion of the deltoid muscle originates. After we fine-tune exact outlines, we can erase redundant lines that lie outside and are no longer required. At the same time, we will keep all the helping lines of constructive drawing that are inside the figure. These lines will gradually disappear in tonal values that we will render later.
Now we can draw with more precision the outline of the deltoid muscle, which at the beginning goes diagonally and in its middle changes direction downwards. The same happens on the other shoulder. The upper and lower halves of the deltoid muscle are tilted at different angles. Two deltoid muscles should look symmetrical and be equal in size to each other. The curve of the deltoid's outline is repeated by the curve of the armpit. The contour of the armpit describes the cross-section of the chest muscle. So, its double line points simultaneously to the collarbone and to the breast bone. The virtual line that connects two armpits goes along the middle portion of the chest muscle and appears as an oval. A similar continuous oval should be also seen at the top of shoulders, which is formed by the outline of the trapezius muscle. These two ovals describe the three-dimensional form of the chest and shoulders. Lower portions of the chest muscle are pointing down from the armpits to the sixth and seventh ribs. There are two contours that describe this anatomy.
There is one important rule you need to keep in mind when drawing the chest muscle. Many beginners draw it as two semicircles that are facing down. However, it is more descriptive to draw the lower edge of the chest muscle as an oval that goes across the two sides of the ribcage and faces upward. This will demonstrate your understanding of the ribcage volume. This oval corresponds to the oval of the chest and the oval of shoulders. The direction of these ovals suggests that the ribcage is located at an angle rather than totally vertical. The biceps of the arm go under the chest muscle, which is pointing to the shoulder's edge. The biceps in turn, are pointing to the coracoid process, which is part of the shoulder blade. This process is located close to the middle of the collarbone. That is why the biceps visually point into the middle of the collarbone.
Below the armpit, there are two more lines—the outline of the ribcage and the outline of the widest muscle of the back. The widest muscle of the back also points to the shoulder's edge and won't go too wide. It is good to draw all body parts in pairs. It is necessary to check that two deltoid muscles are equal in size. There's one important landmark of the chest that is usually ignored by beginners. This is where the second pair of ribs connects to the breastbone. This is also the place between the handle and the body of the breastbone. This landmark is important because there is a slight angle between the two parts of the breastbone, which gives different tonal values of the chest above and below that level.
Drawing what you know is very important, especially when you do it from life. So, only by knowing the anatomy and shapes of the chest will you be able to draw it in a realistic manner.
There are three planes of the chest between the first and second pairs of ribs. Below the second pair of ribs, there are also three main plains of the chest. The geometry between two chest muscles can be ignored for now. At this step, we are only interested in big forms. The eighth pair of ribs is the place where we can see another contour of the ribcage that curves not upward, but downward. This direction coincides with the oblique muscle of the trunk. The top edge of the pelvis can be simplified as an oval. And the back side of that oval is on the same level as the navel. This oval is a virtual line of constructive drawing. Of course, we don't see it as a belt on the model.
When a model stands in contrapposto, one side of the trunk is stretched, while the other is compressed. The straight muscle of the abdomen covers the full length between the bottom edge of the ribcage and the pelvis. In contrapposto, the lower part of the straight muscle of the abdomen is tilted together with the central line of the torso. This muscle has thickness, which has to be depicted to show its three-dimensional volume. The abdominal part of the trunk has its planes. An untrained eye may see only a cylindrical shape, but with the knowledge of anatomy, it is better to mark edges of the oblique muscle and the straight muscle of the abdomen; this will give the figure a more realistic look. The cross-contour of the frontal part of the torso would go forward along the oblique muscle, then flatten before climbing to the abdominal muscle, flatten on top of this muscle and repeat the same geometry on another part of the torso. The similar cross-section will be at the end of the ribcage. The contour would go forward, climb across the abdominal muscle, flatten on top, and go backward in reverse sequence.
Now, about a six-pack. You need to see big masses and how they influence tonal values. The top part of the straight muscle is light, then it is a bit darker. Below the navel is the same picture—light at the top and darker towards the pubic bone. The pair of top planes is tilted toward the light and has lighter value, and the pair of bottom planes has darker value. So, the top portion of the straight muscle of the abdomen will be lighter, the section above the navel darker, the portion below the navel lighter again, and the bottom part of this muscle darker once again. The abdomen looks like a staircase, with lighter and darker tonal values changing each other. Because all these gradations of tonal values are very soft, there won't be hard borders between them. For now, we give suggestions of what tonal values are, rather than working on the final soft rendering. The lateral muscle of the pelvis is parallel to the hip outline. The tailor's muscle goes inward to the medial side of the knee. At the top, these two muscles form a triangle, which is very stable and won't change with movements. The bottom side of this triangle is where the straight portion of the quadriceps muscle shows up. The area between triangles mentioned above is fixed in size and shape. Its geometry and ratio won't change whatever pose a model takes. This rectangular area is a good landmark for an artist.
Let's continue with the arm. Its lateral outline will follow the shapes of the muscles. Where one muscle ends and another begins, the outline curves inward, and another line starts. At the top, there is the deltoid, which is followed by the outline of the triceps, which in turn hide behind the flexor muscle under the biceps, and the biceps themselves. This is an anatomical view of the upper arm. The geometrical structure of the arm can be portrayed by marking edges between planes and applying tonal rendering along contours of those planes. The lateral and frontal sides should have different direction of pencil-hatching. Even though the tones might have similar values, hatching angles will create an illusion of the three-dimensional structure of the arm. The same applies to the other arm—the edge of the biceps' planes separates the two directions of hatching. Such hatching suggests the position of the upper arm, which is turned away from the viewer. The forearm, in contrast, is turned towards the viewer. Several extensor muscles occupy the lateral upper half of the forearm. This group of muscles can be simplified in drawing as one volume. The lower half of the forearm is formed by two almost straight outlines. Its geometry is not affected much by muscles because here are the tendons of the extensor and flexor muscles. The model keeps his arms in the pronated position, and that is why the radial bone crosses the elbow bone. The two bones of the forearm here are forming the X-shape. The outline of the biceps points to the radial bone, to which the biceps connect.
We can see the elbow tip on the model's right arm. Once again, outlines of the forearm follow the shapes of its muscles and bones. All flexor muscles of the forearm can also be grouped together into one volume in drawing. The upper half of the forearm has two groups of muscles–flexors and extensors. That is why, geometrically, the tonal values of each group should be hatched in two directions. However, the lower part of the forearm is simpler in shape and has only three visible planes instead of four. The model's right forearm is seen at a different angle, and its upper half has three planes, while the lower half is mostly represented by one plane. On both sides, we see the foreshortened depth of the lower forearm.
It is up to you in what sequence you carry on drawing. Those parts of the body that are closer to the viewer have to be depicted with more attention; they need to be sharper in contrast and stronger in tonal values. This will create an illusion of aerial perspective. In our case, it is logical to spend a bit more time drawing the knee because it is pointing forward and is closer to us. The big volume of the quadriceps is marked as a prolonged oval. On both sides of the straight portion of the quadriceps, there are two more portions, which are curved at the bottom towards the middle portion. These portions are marked as additional ovals. Between them, there is a tendon that goes from the middle portion towards the knee. We draw the same anatomy of the other leg—the straight portion of the quadriceps and the two additional portions on either side. It's important to keep the alignment and ensure that the muscles of two legs are equal in size.
The tailor's muscle separates the quadriceps from the adductors of the leg. This is also a border between the big frontal plane and the side plane of the upper leg. The same is applicable for the other leg. The medial planes of the thigh are facing away from us, and the quadriceps planes are located frontally. The outlines that are in shadows should be darker, and outlines that are facing the light lighter. At its end, every outline of the leg is facing inward. The strength of outlines can be compared to other parts of the artwork, to make linear drawing balanced. Once again, outlines are following the shapes of muscles and tendons. To depict legs convincingly, we need to draw the knee area anatomy.
The knee joint has the kneecap, which is triangular in shape. To see this triangle, you need to spot three dots of this bone on the model—the two upper corners and the lower one. The plane of the kneecap is turned away from the light and can be rendered in darker tones. Right below the kneecap, there is another triangle at the top of the shinbone. This tuberosity is where the tendon of the quadriceps connects to this bone. This is the top edge of the shinbone, and its circular shape can be marked as an oval. Below this oval is the shin. Most muscles of the thigh are pointing towards the knee. The quadriceps' tendon encapsulates the kneecap and connects to the tuberosity of the shinbone. The tailor's muscle curves around the knee and also connects to this tuberosity. This is the place where the two outlines of the thigh converge. Keep in mind that the two side portions of the quadriceps connect to the tendon right above the kneecap. At the side of the kneecap, there is the edge of the thigh bone...
[ The full lesson is avaibale to Life Drawing Academy members ]
This is your unique chance to get a lifetime academy membership and a dedicated team of art teachers.
Such unlimited personal tutoring is not available anywhere else.
Enroll in the Life Drawing Academy now!


