How to Draw Human Body
This is your unique chance to get unlimited personal tutoring at a tiny fraction of what it really costs.
Don't miss your once-in-a-lifetime opportunity
Enroll in the Life Drawing Academy now!
How to Draw Human Body
By Alexander Ryzhkin
In this video lesson, you will discover How to Draw Human Body.
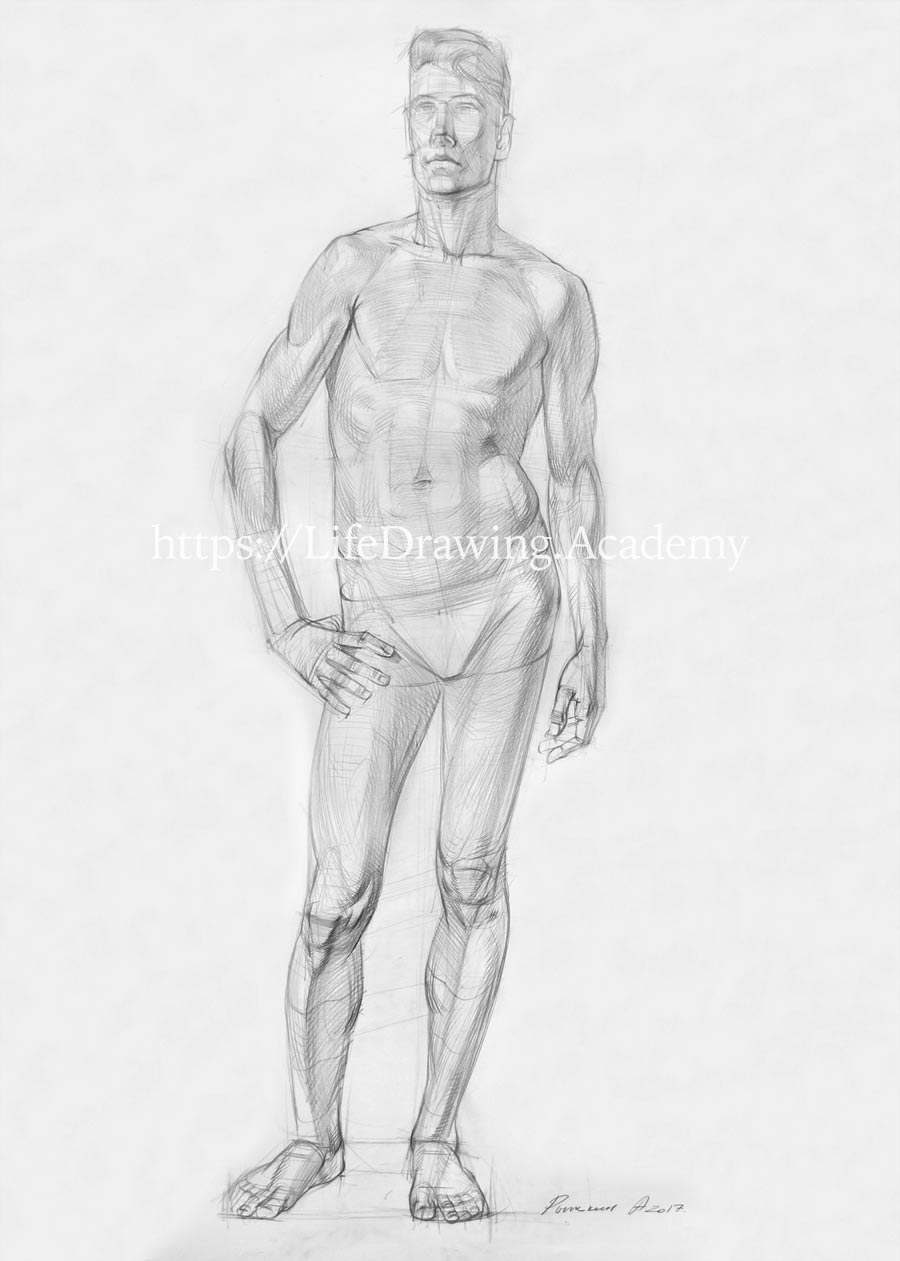
Now we can continue with the shin. At the top, on the lateral part of the shin, there is a group of muscles that extends the foot and toes. The shinbone is not covered by muscles and is easy detectable from the knee to the foot. The same is true on the other lower leg. The shinbone divides the shin in two halves—the medial and lateral. At the top, the line of the shinbone begins with the triangle of tibial tuberosity, and at the bottom, this bone ends at the medial ankle. The outline of the shinbone is not straight but slightly curved, going from the knee to the ankle. At the medial side, we see the outline of the calf muscle. The main mass of this muscle is at top half of the lower leg. The calf muscle actually consists of two muscles. That is why there are two convex outlines on the medial side of the lower leg. Masses of calf muscles on two legs should be similar in size. Also, we need to check the correct alignment between them. On the lateral side of the lower leg are the extensors of toes. Two points of the widest part of the shin are not located on the same level. The lateral point is higher than the medial, which gives a diagonal alignment. The lateral outline of the leg goes downward towards the middle of the ankle. At the bottom, this direction is interrupted by the lateral ankle, which protrudes at a lower level than the medial ankle. At the level of the medial ankle, begins the tarsal part of the foot. Below, there is an outline of the metatarsal bone of the big toe. The lateral and medial outlines of the lower leg are pointing to the big toe. This makes the joint of the big toe an important landmark in drawing. The lateral outline of the foot follows the metatarsal bone of the little toe. From this point of view, two medial ankles lie on the same level. Horizontal alignment should also be applied to the heels.
When drawing a foot in the three-quarter view, make sure that cross-lines at the top of the foot are parallel to the lines of the toes' phalanges. Also, keep in mind that the line of the big and second toes lies at an angle to the line of the other toes. The line of the big and second toes is parallel to the cross-contours of the foot. We can double-check that the top edge of the kneecap is parallel to the top of the foot and also parallel to the line of the big and second toes. If the foot turns to one side, the kneecap will turn in that direction too. The line of the kneecap always aligns to the lines of the foot. To make a figure convincing, make sure those lines are parallel in your drawing. Now we can say a few words about the cross-section of the lower leg. It goes around the calf muscle, swells forward around the shinbone, and circles the mass of extensors of the foot. It is quite an important step to mark or keep in mind the cross-sections of the leg. Later on, these outlines will help to reveal three-dimensional nature of the leg in tonal rendering along those contours.
Contrast and tonal values can be used to describe which parts of the figure are closer to the viewer. For example, the knee of the relaxed leg is closer to us and should be rendered with more attention. That is why we can apply deeper tones and stronger contrasts when rendering tonal values of this knee. The direction of pencil strokes can tell a lot about the form. It is better to apply strokes along the contours of the body. Do not confuse contours and outlines. Outlines are visible edges of the figure, and contours are virtual lines of cross-sections. To portray the anatomy of a figure, use pencil strokes as if you are "sculpting" a figure, describing every volume of muscles along its contours. Big areas can be rendered in one direction to simplify the shape and to build up tonal values rapidly. Edges between planes can be rendered with more contrast. This helps to attract attention to key places of every structure of the body. This way, such edges will visually extend forward. Wherever the outline of a body curves inward, it attracts deeper tonal values.
At this step, it is not necessary to do a thorough rendering of every square inch of the figure. We concentrate only on important landmarks like edges and contours that help to describe the shape of the body. Other places require less attention. This makes a drawing more interesting and leaves a viewer to imagine what is not fully described in pencil rendering. It is a good practice not to concentrate for too long on one part of the drawing. Let's come back to the central part of the figure. Here's one important tip to remember. Contours that go around a body seldom meet the outer outline at a right angle. Instead, they will curve around softly. Any circular shapes that are seen in perspective resemble ovals. Circles do not have sharp edges, and neither do ovals. When drawing various parts of the body, always compare their tonal values to each other. Keep the whole figure in view.
Now we can continue to drawing the hands. The outline of the wrist begins from the end of the radial bone. You need to compare the level of the wrists on both arms, on the model and in the drawing. If the hand is extended, there will be two cross-contours of the wrist. The block of the hand is almost a square. It is better to draw the blocks of the left and right hands simultaneously, keeping their sizes equal. There is one trick that makes drawing fingers easier. Instead of drawing fingers one by one in their sequential order, you can first depict the index finger and then the little finger. By drawing negative spaces between these fingers, you can complete the hand with the remaining two fingers. The middle finger is the longest one. The index and the ring fingers have almost the same length. We have a side view of the model's left hand. In this view, it is important to mark a triangle between the metacarpal bones of the thumb and the index finger. The thumb has a different angle of connection to the hand compared to the other fingers. Also, it consists of only two phalanges, while all other fingers have three. When the hand is relaxed, the thumb ends at approximately the same level where second phalange of the index finger begins. The index finger together with the thumb form a virtual geometrical shape that you check on the model and depict in drawing. The joints of each finger on the dorsal side of the hand have convex outlines, while on the palmar side they have folds instead. As soon as we have indicated a few fingers, we need to double-check that the two hands have equal lengths. After such a check, we can draw all the remaining fingers. By sketching the cross-contours of every joint, you will make the hand appear more realistic. Make sure that these cross-contours are parallel to each other. To indicate volume, we can add some tonal values, starting shading from the joints. When drawing small details like fingers, we shouldn't forget about the big volumes of the whole figure. Several areas of the figure are in shade, such as the side of the trunk, the thigh, and both shins.
There is one key point of the torso—the bottom edge of the ribcage. This is where big shadow that spans from the shoulder terminates. The area below this point is lighter in tone. That is why we can shade the side of the torso in wide pencil strokes, covering the whole area from the shoulder to the bottom of the ribcage. The area between the end of the ribcage and the hip-joint has lighter tone. Another big shadow is between the hip-joint and the knee. Once again, we can render it using wide pencil strokes, covering the side of the thigh in shade. We portray the movement of big masses using tonal rendering. The figure's outline is just following that direction. Tonal values should be rendered in multiple layers. This time, we can apply pencil strokes along cross-contours. The direction of cross-contours above and below the key point is different. We see the ribcage from below and the pelvis from above. Cross-contours of the supporting thigh are seen from above, which dictates the direction of the rendering strokes. So, for now we have to pay attention to big masses before rendering small details. Opposite the supporting leg, cross-contours of the relaxed thigh are seen from below. This changes the direction of strokes accordingly. The lower half of the thigh is slightly darker in tone than the top half.
Here's one good tip for rendering tonal values of paired objects like legs. Shade the same areas on both legs simultaneously. You can do two thighs and then two shins, for example. Do it as if two shins or two thighs were parts of the same single object with a gap between them. This will make an artwork more credible. Rendering small details of one leg can at the beginning, can end up with it looking very different from the other leg. Using long pencil strokes that unite big masses is very helpful to make a drawing more artistic. Should you work only in small strokes always across the form, the end result might look dry and uninteresting. The same approach to working on tonal rendering is applicable to smaller areas of the figure. We can continue working on hands, arms, and other parts, to gradually develop the whole figure, so no parts are left un-rendered.
Tonal rendering has more in common with painting than with constructive drawing. We can already see that the figure is built properly, all proportions are in place, and the anatomy is correct. From now on, it is up to the artist how long to work on such a drawing. It depends on the creative task and the time available. We can continue with drawing the head. There is a rule when drawing a head in a full-figure artwork. The drawing style of the portrait has to be the same as the style of the figure. That is why we will be concentrating on big masses of the head rather than going into small details of facial features. We see the model's head from below, and at this angle, the base of the nose appears a bit higher than the bottom line of the ears. Because the top line of the ears coincides with the eyebrow line, from this angle, the eyebrows will be slightly higher than the ears.
The central line of the face helps to portray it as symmetrical. And before going into facial features, we draw the big mass of the head by shading its side plane in the same manner as we did for the torso. Before drawing the nose, we need to mark the cross-section of its bridge and its planes below the eyebrows. These big shapes are more important than the eye itself. We shade planes below the eyebrows and the bottom plane of the nose, and we will come back to eyes later. Now we can mark the location of the mouth. According to classical proportions, the bottom edge of the lower lip divides the distance between the base of the nose and the chin in half. Once again, we are more interested in the shadow plane beneath the lower lip. Side planes of the head are also important landmarks in head drawing. Small details are still less important than big shapes.
The forehead can be also described by geometrical planes. The hairstyle repeats the shape of the head, adding some volume around the skull. Every time you draw a hairstyle, mark the hairline. This is an important landmark of a face. Because it is seen from below, this line curves upward, the same as the line of eyebrows. Because at this stage we do not describe small details, the same principle is used for hairstyle. We are only suggesting its shape in drawing rather than rendering with full attention. Another important landmark of any portrait is the neck muscle that connects the base of the skull with the collarbone and the top of the breastbone. According to this anatomy, the outlines of the neck go down to the collarbones.
In the front, between the two neck muscles is the throat, which has a different angle than the muscles. It helps to draw the cross-contour of the neck. We can simplify it as if the neck consisted of geometrical planes rather than a cylindrical shape. These planes describe the volume of muscles and the protruding throat.
When it comes to tonal rendering, borders between protruding planes, like on the chin and on the nose, are rendered with stronger contrast to emphasize their shapes. The same goes for the borders of the cheeks' planes. The neck should be rendered with less contrast than the face to create an illusion of aerial perspective...
[ The full lesson is avaibale to Life Drawing Academy members ]
This is your unique chance to get a lifetime academy membership and a dedicated team of art teachers.
Such unlimited personal tutoring is not available anywhere else.
Enroll in the Life Drawing Academy now!


