Video by Vladimir London
Enroll in the Life Drawing Academy now!
How to Draw Vases from Imagination
Video by Vladimir London, a Life Drawing Academy tutor
In this video, I will show you how to use constructive drawing principles and rules of perspective to draw standing and reclining cylindrical objects. These topics are included and explained in depth in the Life Drawing Academy Correspondence Course, where students receive unlimited personal tutoring in 100 drawing tasks.
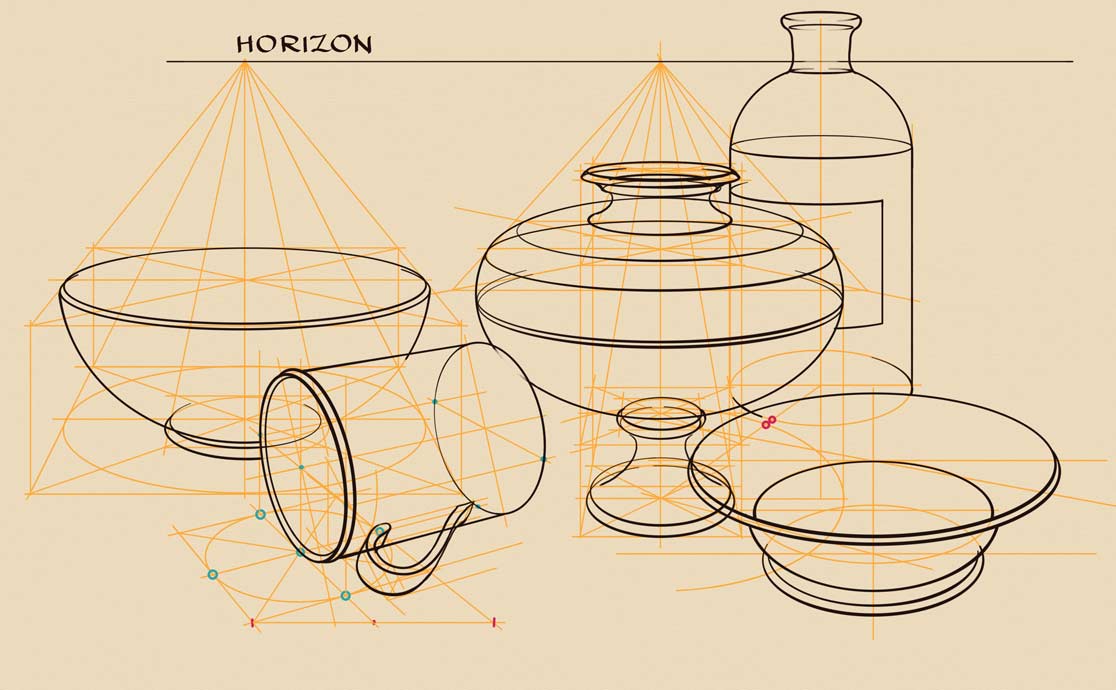
Let's begin with the horizon line. A horizon is always at the viewer's eye level. The first vase is standing and therefore we can use a one-point perspective. The vase's footprint is depicted as a square in this one point perspective. Its vanishing lines are converging into one vanishing point. At the top, we can use the same size square to extend its diagonals. These diagonal lines help us to plot a bigger square in the same one-point perspective and inscribe a big oval into this virtual square. Above the footprint, I use one more square to get the geometry of the vase's foot. Such squares are great guides for drawing ovals. Please note, these ovals are perfectly elliptical, but they are called ovals, not ellipses because each oval has only one axis of symmetry. With all major preparatory lines in place, I can draw the vase in bolder and darker contours and outlines. Also, note that I draw this vase as if it is totally transparent. This is one of the major constructive drawing principles of wireframe drawing. Another thing to keep in mind is the aerial perspective. According to its rules, the lines that are closer to a viewer should be darker and bolder than those lines that are further away. You may see that ovals are outlined in such a way that their front halves are bolder. The first vase is complete. I can now add another cylindrical object. Let's draw a plate. Its relation to the first vase is indicated by two tilted lines. This helps to establish the plate's height. Instead of drawing vanishing lines and plotting squares in one-point perspective, it is faster to use an already established point of view and draw ovals that correspond to the first vase. You can see that the fullness of the ovals of the vase and of the plate is the same. The fullness in this case means the height-to-width ratio.
Now, I will draw a standing bottle behind the vase. To make sure it does not intersect the vase, I marked the projection of the vase shoulder on the ground. This projection does not cross the bottle's footprint. The distance between these two objects is indicated by two red dots on the ground. Once again, I don't need a vanishing point and square to draw the bottle's ovals because the first vase gives the needed width-to-height ratio of such ovals. At the top, the bottle will cross the horizon level, which means that its neck is seen from below while the body from above. You may notice that the bottle is outlined in slightly slimmer lines than the plate because this bottle is further away from a viewer. I also would like to point out that all objects in this drawing are depicted as if you could see through them.
The next object will be a reclining mug with a handle. To make sure it is seen from the same point of view as other items, I first marked a virtual oval on the ground in the same perspective. A perfect square is outlined around this oval in a two-point perspective. We know it is a perfect square in correct perspective because a perfectly elliptical oval touches its four sides in the middle of each side. Such points are marked in green here. Now, I can use the virtual oval on the ground to draw a real vertical oval with the same size in two-point perspective. Its dimension is equal to the blue line. The tilt of this oval is 90 degrees to the mug's axis of symmetry. This is an important rule when it comes to drawing reclining cylinders. At another end of this mug, there is a partly visible oval, which is always fuller than the visible one. Its tilt is also perpendicular to the mug's axis of symmetry. So far, this mug is a simple reclining cylinder. I need to add a handle. A projection of this handle on the ground follows the same two-point perspective. Check out the video on How to draw a handle of a mug.
Virtual lines help to make sure that this handle does not levitate nor intersect the ground. I will complete this drawing with one more cylindrical object. Let's draw a bowl. It is easy to depict it without vanishing lines of one-point perspective, but I will show you once again how such perspective is used for drawing standing vases and bowls. The footprint is marked as a perfect elliptical oval inscribed into a square in one-point perspective. I use this square to plot a virtual cuboid. The top plane of this cuboid contains the bowl's oval. The aerial perspective is also in place. The bowl's footprint is inscribed into a small square in the same one-point perspective. The bowl's outlines complete this drawing.
Learn more about the Best Drawing Course
To learn good drawing techniques, enroll in the Life Drawing Academy course:
Online Course
A self-study, self-paced course for you to learn fundamental methods of classical drawing and improve life drawing skills by watching video lessons and doing assignments
- Unlimited access to 52 life drawing video lessons
- Lifetime membership without deadlines
- Unlimited support from the Academy tutors
- Constructive critique of your artworks
- Member access to the Academy's Art community
- Place in the Academy's Students Gallery
- Exclusive members-only newsletter and bonuses
- Life Drawing Academy Diploma of Excellence in your name
One-time payment - Lifetime membership
$297 USD
Personal Tutoring Online + Online Course
The ultimate choice if you who would like to receive personal, one-to-one tutoring from the Academy teachers, which is custom-tailored to your skills and needs
- Everything in Online Course, plus:
- Dedicated team of art tutors
- Assessment of your current level of drawing skills
- Personalized curriculum tailored to your skills and goals
- Up to 100 drawing tasks with by-task assessment
- Unlimited one-to-one personal coaching with detailed per-task instructions and feedback
- Artwork critiques and results-oriented guidance
One-time payment - Lifetime membership
$997 USD


