How to make a mold and cast a head sculpture
Enroll in the Life Drawing Academy now!
How to Sculpt a Head
By Vladimir London
In this video, I will show you how to cast a sculpture of a classical male head. This clay model is a bit smaller than the life size. It is made of WED clay. The model is dry by now and is ready for making a mold for casting. Before applying coats of silicone for making a soft mold, I need to spray this sculpture with this release agent. This spray will prevent silicone from sticking to the model for good. It is better to use this spray outdoors because fumes will be all over the place.
The release agent is fully dry by now. It covers the entire head sculpture in a very thin and shiny film. Instead of a release spray it is also possible to use some technical vaseline, which is much cheaper.
For a soft mold, I will use this multi-purpose white silicone. It is the cheapest I could find. I have to say that the purpose of this exercise is to test if it is possible to make a sculpture casting with very cheap materials that are not designed for art. Previously, I was using proper silicones, casting resins and other professional grade art materials for casting. Such materials are very expensive. So, I decided to test if cheap stuff would be any good for sculpting. I know that this silicone is very flexible and resistant to breaking. When it's dry, it can be stretched four times of its original size without any damage. This is very good. However, I also know that this silicone shrinks in size when it dries. This might be a real problem. This is what I want to test. How much a soft silicone mold will reduce in size and would it affect the appearance of a casted head?
This silicone has some smell, so I'm working in a well-ventilated room. For applying this silicone, I'm using very cheap synthetic brushes because it would be very difficult to clean up brushes afterwards. By the way, turpentine can be used to clean up brushes from silicone, but it has to be done before silicone hardens. Should you miss the moment, a brush would be wasted. So, it makes sense to use cheap and disposable brushes for this purpose. Because this is the very first layer of soft mold, it is very important to apply brushstrokes carefully, covering all the areas. Every imperfection in this layer will be visible on the casted sculpture. Patience is required for this job. I also need to mention that it would probably take me six to eight hours to make a soft mold. It has to be done in one day. That is why it is better to plan such a job from the morning. The reason why it has to be done in one long session is because it will take several layers of silicone to make a soft mold. Anything from five to six layers would be sufficient. Every layer of silicone has to be touch dry, but not fully dry before applying the next layer. That is why I cannot leave this job and continue tomorrow. By then, the silicone layer would be fully dry and the next layer won't stick on top. When the mold is stretched, layers might separate and many hours of work would be wasted. So, it is going to be a long day to make this mold. I'm using the word "soft mold" because there will be one more - "hard mold" to support the silicone one. The purpose of this soft mold is to be flexible while holding every tiny detail of the sculpture. Silicone is waterproof and therefore is an ideal material for casting purposes. It will work equally well with plaster, resin, or even low-temperature melting metal. Of course, I would not go to such extremes as hot casting, because it is much easier to cold cast in various materials that can be decorated as bronze or copper. In one of my previous videos, I demonstrated how to cold-cast in actual bronze using metal powder mixed with resin. Such a sculpture not only looks like a real bronze bust, but also oxidizes as bronze because it is actually made of real bronze dust.
As you can see, I'm applying the first layer very thinly. The purpose of this layer is not to build up some thickness, but to repeat every surface of the sculpture with precision without any missing gaps or visible brushstrokes. To avoid brushstroke marks on the surface, I'm using a soft brush. Of course, it would be much better to have some more liquid silicone, like tin silicone for the first layer, but as a part of experiment, I want to see if it is possible to skip some traditional steps of mold-making and use the cheapest materials for a soft mold. The process of applying the first layer is rather slow. I have to carefully cover every place several times to make sure that silicone sticks nicely to every bit of the surface. It will be easier and faster to apply the next layers.
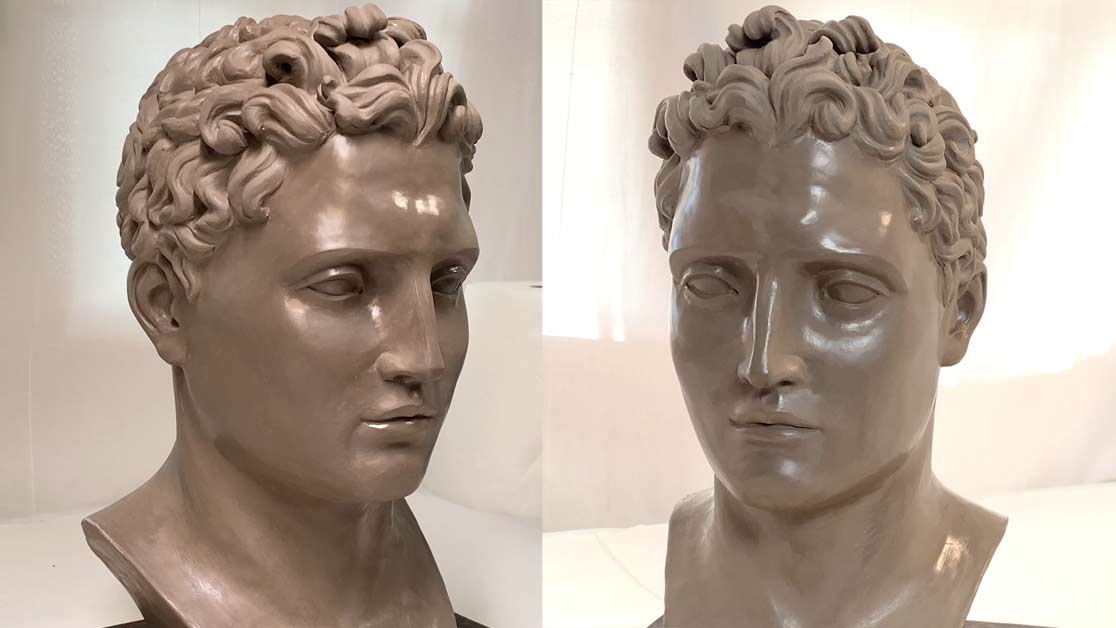
While I am working on the soft mold, I would like to tell a few words about this sculpture. The idea of making this bust came to me after visiting the Museum Prado in Madrid and seeing the ancient bronze head of Demitrio. Although that sculpture was damaged, the beauty of proportions, attention to detail and great mastery of the sculptor inspired me to make a small head to demonstrate classical canons of the head and face proportions to my art students. Such canons of proportions are taught in the Life Drawing Academy video course. This art course is very special. It comes with 52 video lessons on how to draw portraits and figures from life, memory and imagination. The course tutors demonstrate in front of students' eyes how to draw a face, hands, head and shoulders, torso, and full figures the professional way. In this online video course, you can learn all the know-how of figurative drawing. This includes such topics as proportions of a head, face and body, anatomy for artists, professional rendering techniques, and so on. The information you will get in this course is not taught at contemporary art colleges. This course is very comprehensive, yet it requires some basic knowledge of constructive drawing principles. If you feel that you are not ready to take on portrait and figure drawing, your best choice would be the Life Drawing Academy Correspondence Course. This is probably the best drawing course available today on the Internet. At least, I have not seen anything better and more affordable. There are eight reasons why the Life Drawing Academy Correspondence Course is unique.
The first layer of silicone is complete and touch dry by now. Touch-dry means that it is possible to touch it with a finger, but the layer is still soft and a bit sticky. However, it does not come off as wet paint from the model. This is the time to apply the second coat of silicone. This layer should be thicker. Its purpose is to build up the thickness of the soft mold. To see the difference between layers, the next coat will be colored in blue. A special paint can be mixed with silicone. I'm not sure if some other paints are suited for the job and therefore will apply the proper art material rather than experiment with uncertain results. I will now cut and glue to the soft mold several pieces of silicone. These pieces are essential for keeping this soft mold inside the hard mold. Here's another art material you would need to make silicone thicker. Only a tiny percentage of this medium should be added. Here's the piece of silicone I prepared earlier. It is dry and can be used for adding some keys to the soft mold. These keys would play their role for fixing the soft mold inside the hard mold. Later in this video you will see how it works. I mix this medium with silicone using a wooden stick. This stick also can be used for applying thick silicone on the model. The reason why thicker silicone is needed is to make thicker and heavier coats that would stay in place without flowing down. The thick coat is required to fill all depressions on the surface. Otherwise, such depressions might prevent disassembling of a hard mold. Of course, it adds thickness, but this head sculpture does not have too deep places and the maximum thickness of the soft mold won't by any greater than half an inch. In thin places, it will be about five millimeters thick. While the surface of the mold is still wet, I will glue a piece of silicone to it. Thickly mixed silicone is used as glue. Several more pieces of silicone will be added in some strategic places where this mold is too thin and needs some support. Another important part of the soft mold is a ridge, which is about half an inch high. Along this ridge, there will be a border between two pieces of a hard mold. I am applying the final coat of silicone. It has to be smooth because it will be in contact with the hard mold. That is why I'm using the palette knife to smooth up the soft mold surface.
The soft mold is done. I will find out if it is any good only after making the hard mold and casting this male head sculpture. Before making the hard mold, I will wrap the model with a plastic film. This will further smooth up the uneven surface of the soft mold and make separation of mold pieces easier. For the hard mold, I will use very cheap plaster. There are two reasons for that. First of all, I run out of plaster bandages. Secondly, I want to test if plaster bandages can be replaced by do-it-yourself materials. To make the plaster bandage, I will use a regular muslin-cloth bandage and add wet plaster on top of it. I have to say that this way is not easy nor fast. Every piece of bandage has to be manually prepared with no less and no more plaster than needed. It takes time and effort. Apart from labor, this job is quite messy. Here's my advice - if you have ready-made plaster bandages, use them. It will speed up the job at least two or three times. The whole model has to be covered with plaster bandages. There will be two separate pieces of this mold. Every piece of plaster bandage has to overlap about half an inch the neighboring piece to glue them together firmly. There will be at least two layers of plaster bandages in thick places and in places where structural rigidness is required there will be three to four layers. Also, every piece of bandage is folded two times to make it stronger. One half of the hard mold is complete. Its border goes along the silicone ridge. You may also notice that this border is not even, but has some indents. This is done on purpose. The second half of the hard mold will repeat this pattern, so two pieces will join together like fingers of two hands, interlocking their borders. Between two halves, there is a plastic film that will prevent plaster sticking. To make a piece of plaster bandage, I cut the muslin cloth, then fold it in half and wet this cloth in water. Then, I sprinkle wet cloth with plaster, which quickly absorbs water. A palette knife is used to spread plaster in even layer. A bit more water might be added to achieve the needed wetness of plaster. It will take many pieces of plaster bandages in several layers to complete this half of the hard mold. When the hard mold is done, it should dry for a couple of days. When this mold no longer feels cool on touch, it is fully dry and ready to be taken apart. This is when having a plastic film between two parts of the hard mold really helps. These parts are interlocked mechanically, but they are not joined with wet plaster.
Now, I need to cut open the soft silicone mold. The cut line will be at the back of the head. The soft mold comes off the model nicely. The release agent prevented silicone sticking to clay. I have to be careful when removing the soft mold off the model's hairstyle. It has intricate details that grip to the mold and might break off from the model. Here we go, the soft mold is off. It looks rather good despite the fact that I used the cheapest silicone for it. The downside of this silicone is it shrinks in size. So the soft mold is actually slightly smaller than the space inside the hard mold. This would cause a small gap where the cut line is. To close that gap, I had to stitch two edges together with this red thread.
I placed the soft mold inside the hard one and you can notice that silicone keys are protruding outside. They are fixed with small nails. To keep two parts of the hard mold together, I wrap it up in plastic film and fix it with masking tape. A piece of wood wrapped in plastic film will serve as the cap to seal the opening at the base of this sculpture. Now, it's time to prepare plaster for casting. Once again, I want to test how the cheapest plaster which is not meant to be used for sculpture would fit for this purpose. I will measure the needed proportion of plaster to water as advised by the manufacturer. The plaster to water ratio has to be measured by weight. The way of achieving good consistency of plaster for casting is adding plaster into water, not vice versa. Plaster has to be added little by little, so it has time to soak water throughout and sink down. It has to be mixed very thoroughly to become a homogeneous liquid. No bits of plaster should remain in this mix.
I pour liquid plaster carefully inside the mold. This has to be done accurately, so no air bubbles would be trapped beneath plaster or inside it. Then I seal the opening with a wooden cap. Plasticine along its edges will keep this cap in place and prevent plaster leaking out. I shake slightly and rotate the mold, so the plaster inside would cover all the inner surface evenly and without air bubbles. I will keep rotating the mold in all directions until the plaster hardens inside. After the plaster hardened, I waited for 24 hours for it to become very hard. Now, it's time to disassemble the mold and take the sculpture out. I cut off the plastic film together with masking tape. Small nails are removed with pliers. These nails were piercing the silicone keys, fixing the soft mold inside the hard one with rescission. Finally, I can take apart the hard mold. Before releasing the sculpture, I have to cut red threads to open the soft mold.
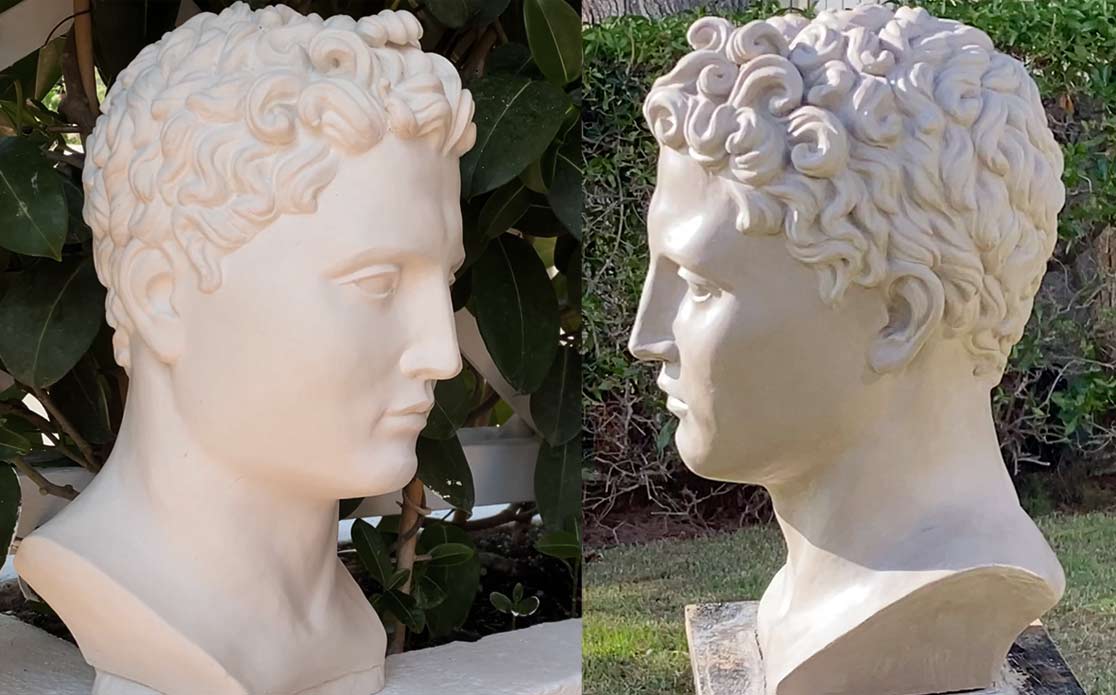
It's time to see if the sculpture is any good. I carefully remove the soft mold. The plaster is hard, but it might be fragile. It will become harder when it fully dries. Once again, extra care has to be taken when removing the soft mold from the hairstyle. I do not want to break any pieces of hair curls. I have to say that this experiment went well. Can very cheap silicone and plaster be used for sculpture casting? Yes! Would I recommend cutting costs on silicone? No! The main reason why proper silicone is better is because it does not shrink. For example, the original proportions of this head were slightly different from the final result. If size and proportions do not matter, then using cheap silicone is acceptable. However, if you want a casted sculpture to be exactly the same size as the original model, then you need to use proper art materials. Anyway, I'm very pleased with the results and this cast will decorate my garden.
To learn more about sculpting and casting models that you can use for drawing from life, enroll in the Life Drawing Academy course. In this course, you will learn how to draw realistic portraits and figures with the needed knowledge of constructive drawing principles, anatomy for artists, proportions and proper rendering techniques.
To learn good drawing techniques, enroll in the Life Drawing Academy course:
Online Course
A self-study, self-paced course for you to learn fundamental methods of classical drawing and improve life drawing skills by watching video lessons and doing assignments
- Unlimited access to 52 life drawing video lessons
- Lifetime membership without deadlines
- Unlimited support from the Academy tutors
- Constructive critique of your artworks
- Member access to the Academy's Art community
- Place in the Academy's Students Gallery
- Exclusive members-only newsletter and bonuses
- Life Drawing Academy Diploma of Excellence in your name
One-time payment - Lifetime membership
$297 USD
Personal Tutoring Online + Online Course
The ultimate choice if you who would like to receive personal, one-to-one tutoring from the Academy teachers, which is custom-tailored to your skills and needs
- Everything in Online Course, plus:
- Dedicated team of art tutors
- Assessment of your current level of drawing skills
- Personalized curriculum tailored to your skills and goals
- Up to 100 drawing tasks with by-task assessment
- Unlimited one-to-one personal coaching with detailed per-task instructions and feedback
- Artwork critiques and results-oriented guidance
One-time payment - Lifetime membership
$997 USD


