Video by Vladimir London
Enroll in the Life Drawing Academy now!
How to Draw Cones
Video by Vladimir London, a Life Drawing Academy tutor
In this video, you will discover how to draw standing and reclining cones in perspective. Drawing geometric objects is a small part of the Life Drawing Academy Correspondence Course curriculum.
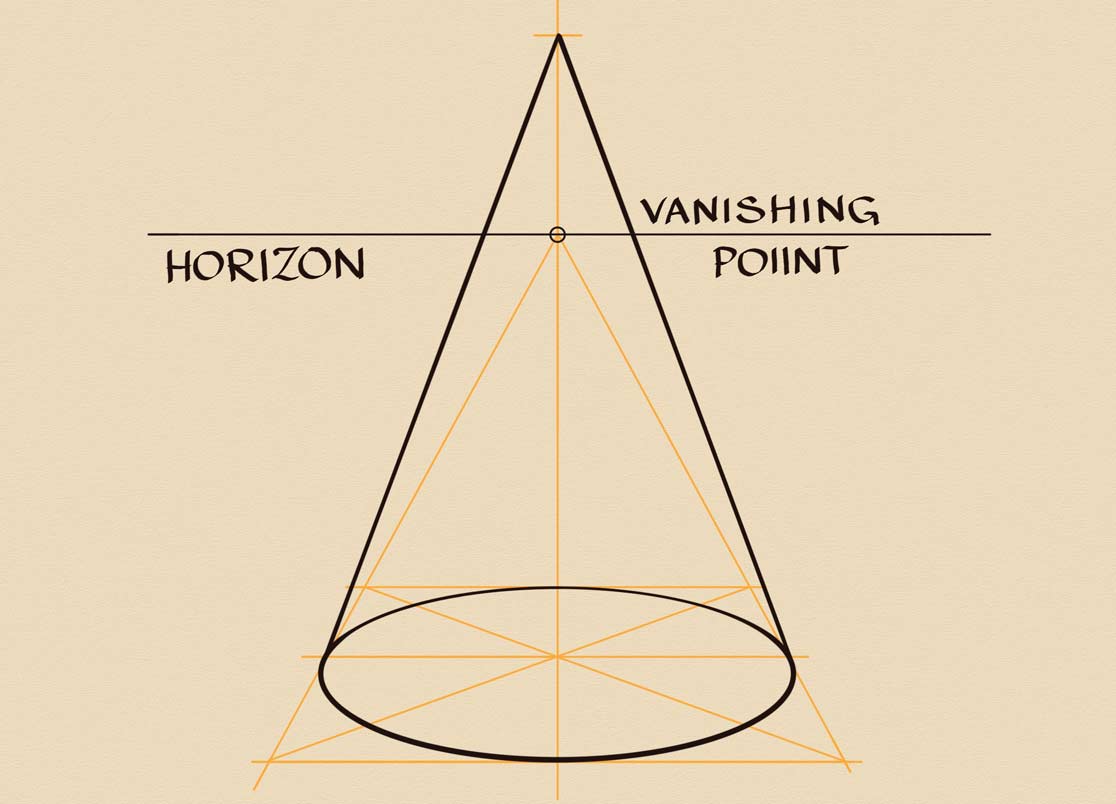
Let's begin with a standing cone. This drawing will be done in a one-point perspective. The horizon line is almost in the middle, which means that the cone will be standing at the viewer's eye level. There is only one vanishing point. Two vanishing lines are converging into this point. At the bottom, there is a square in perspective. The cross-point of its diagonals is the center of that square. A perfect elliptical oval is inscribed into this square. Two outlines of the cone meet at the top, which is above the horizon. The footprint is a circle in perspective. Check the aerial perspective in this drawing. Dark lines have variable boldness according to its rules.
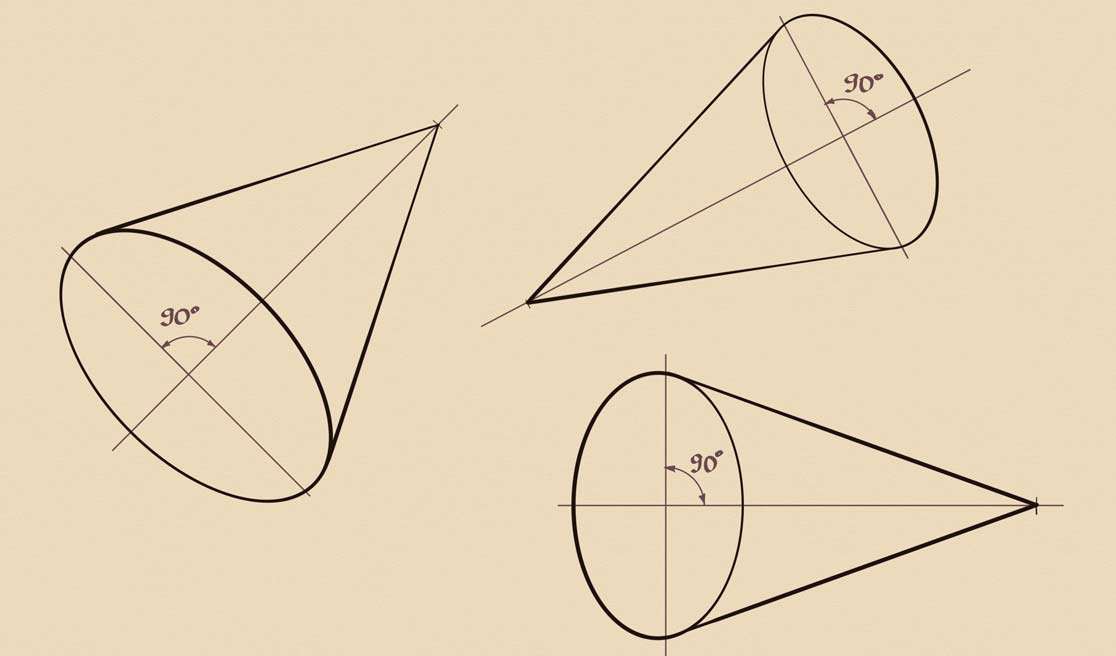
Standing cones require one-point perspective. But how about reclining cones? The rule is: the main axis of the oval must be strictly perpendicular to the cone's axis of symmetry. It works for cones in all cases - standing and reclining. Here's a tilted cone that follows the aerial perspective. Its outlines have variable boldness. I will draw another tilted cone at a different point of view. Once again, its two axes are strictly perpendicular to each other. One more cone will have a horizontal axis of symmetry. All these drawings are correct, but it is hard to tell which linear perspective is used. Are they reclining or just tilted at some angle?
By dividing the depth, I can draw a perfect circle in perspective, which has an elliptical shape. This circle is inscribed into a square. We know it is a square because the inscribed circle touches its four sides in the middle of each side. Through the center of the oval, goes the cone's axis of symmetry. The axis of the cone's base is perpendicular to the axis of symmetry. The base is equal in size to the horizontal circle inscribed into a square. That is why it goes through two points marked in green. The rest is simple - I just need to mark the vertex and connect it with the base with two tilted lines that follow the rules of aerial perspective. This cone is horizontal. The distance from its vertex to the green dot is the same as the cone's radius. This cone is in the correct two-point perspective, but at the beginning of this drawing, it was hard to tell where it would touch the ground.
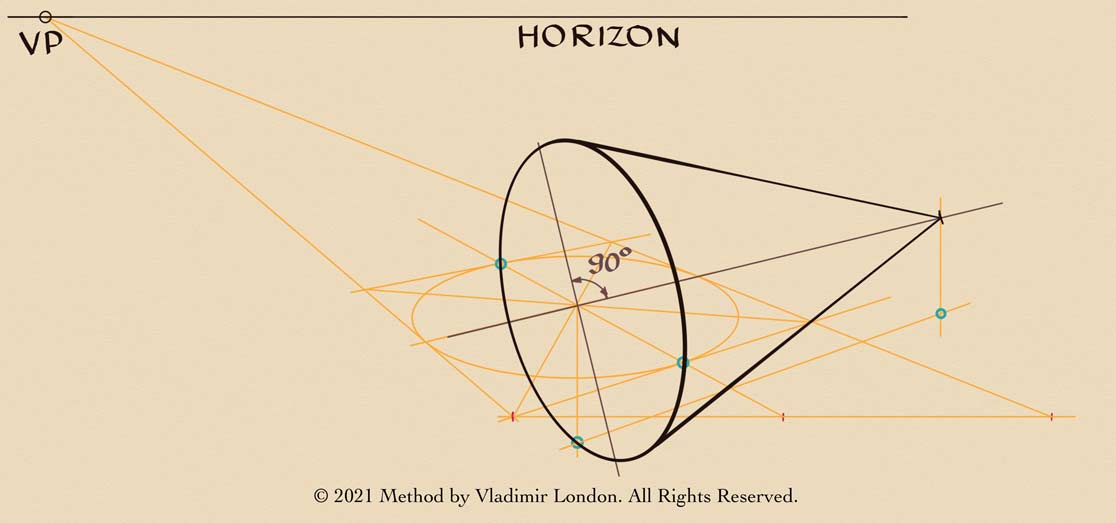
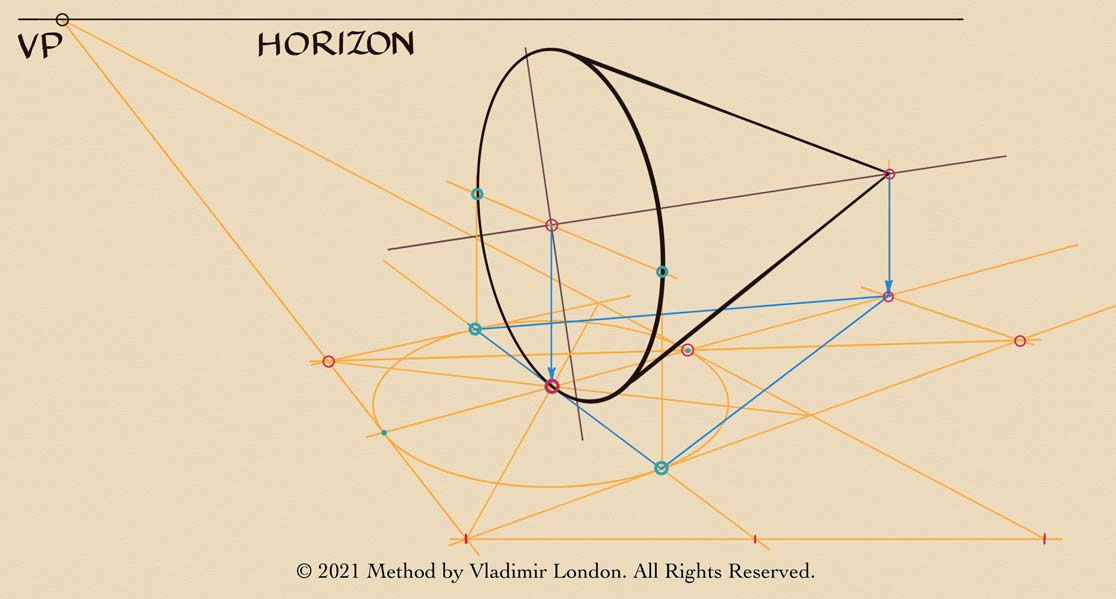
Now, I will show you how to draw a horizontal cone that touches the ground. We will again use a special method of drawing a square in perspective that I developed for Life Drawing Academy students. With the horizon at the top, a cone will be seen from above. One vanishing line goes into the left vanishing point. Then, I draw a horizontal line to divide the depth in half. It is split into two equal parts. Two more vanishing lines goe into the same vanishing point. One more vanishing line points into the vanishing point beyond the drawing area on the right-hand side. A perfect ellipse touches three vanishing lines in such a way that the red dot is exactly in the middle of the frontal line. This middle in perspective was found by dividing the depth in half. This is important. Only one ellipse can fit the given geometry of two vanishing points. Even though we do not know where the right vanishing point is, the circle follows this perspective. I can complete the square with the forth side. It is a perfect square in the given perspective because a correct ellipse is inscribed into it. The cross-point of its diagonals gives the center of the oval. Through this center, I can draw a vanishing line. So, this know-how allows us to draw squares and circles in a two-point perspective regardless whether we see vanishing points on the drawing area or they lie somewhere beyond it. As long as a perfectly elliptical oval touches four sides of a square in the middle of each side, everything is correct. I will now use the oval's diameter, marked here in blue, as a measuring stick. Through the middle of this line, goes the axis of cone's symmetry. This line points into the vanishing point on the right-hand side. The cone's base axis is perpendicular to that line. Another vanishing line goes through the base center, pointing into the vanishing point on the left-hand side. Two vertical projections give us the width of the base, marked in green dots. An elliptical oval goes through these dots and touches the central point on the ground. I will mark it as a bold red dot. Now, let's make this cone a modular cone. How to draw modular objects is explained in a separate video.
The height of this cone is precisely one-and-a-half times greater than its base diameter. In this case, the module is equal to the cone's radius. Also, this cone is perfectly horizontal because the distance from its vertex to the ground is equal to the radius. To complete this drawing, I will draw a projection of this cone to the ground in blue lines. The height of this triangle is one-and-a-half times greater than its base because we depicted a modular cone.
To learn good drawing techniques, enroll in the Life Drawing Academy course:
Online Course
A self-study, self-paced course for you to learn fundamental methods of classical drawing and improve life drawing skills by watching video lessons and doing assignments
- Unlimited access to 52 life drawing video lessons
- Lifetime membership without deadlines
- Unlimited support from the Academy tutors
- Constructive critique of your artworks
- Member access to the Academy's Art community
- Place in the Academy's Students Gallery
- Exclusive members-only newsletter and bonuses
- Life Drawing Academy Diploma of Excellence in your name
One-time payment - Lifetime membership
$297 USD
Personal Tutoring Online + Online Course
The ultimate choice if you who would like to receive personal, one-to-one tutoring from the Academy teachers, which is custom-tailored to your skills and needs
- Everything in Online Course, plus:
- Dedicated team of art tutors
- Assessment of your current level of drawing skills
- Personalized curriculum tailored to your skills and goals
- Up to 100 drawing tasks with by-task assessment
- Unlimited one-to-one personal coaching with detailed per-task instructions and feedback
- Artwork critiques and results-oriented guidance
One-time payment - Lifetime membership
$997 USD


